This blog began in late 2006 with the planning and preparation for a circumnavigation of the world in my 39-foot sail boat Pachuca. It then covered a successful 5-year circumnavigation that ended in April 2013. The blog now covers life with Pachuca back home in Australia.

Pachuca

Pachuca
Pachuca in Port Angeles, WA USA

Sunday, June 26, 2011

Finished Painting Quarter Berth Area

Port Berth
Other than a some minor tidying up it looks like I have finished repainting and varnishing the quarter berth section of the boat.  I used more than 2 liters of Imron paint (that's a lot) in laying down the 2 coats.  Yesterday I put the second coat of varnish on the wood pieces and today I secured the cabling and remounted various fittings that I had removed for the work.
Intermediate Area Between Berths

Looking to Starboard Berth

The blue material on in the port quarter berth is a lee cloth that Arnold used when he slept in the berth.  Now it is handy for holding material in during long crossings.  The photo through the crossover to the starboard berth shows green masking tape that I have since removed.  The metal dome protects the refrigerator compartment exhaust fan.  The hose at the rear of the starboard berth has some white paint on it.  Professional pride compels me to proclaim that it (and many humungous drips) was done by a predecessor who was ... let's be kind and say "impatient".

I've included a photo the the 30 meter mark of the chain, with an intermediate 5 meter mark above it.  I laid out one section at a time and used the last of the day's paint to brush on the appropriate mark: 1extra long mark for 10 meters, 2 marks for 20 meters, 3 marks for 30 meters, with a single intermediate mark every 5 meters.  I painted an extra long single mark at 35 meters to represent the end of the usable chain.

The engine is now running for the first time since Brenda's departure, and since Jak and I (with key help from Joel) installed the exhaust ball cock valve.  I wanted to make sure that the engine wiring was still OK, and also to check the outflow from the exhaust, as Mark had advised from Port Townsend.
Starboard Berth

Starboard Berth (Used for Cargo Only)

30 Meter Mark with Intermediate Representing 25 Meters
I first checked that the inlet and exhaust valves were open, even though I knew that they were, powered up the electronics to find that there were 70.3 engine hours on the clock, then hit the "start" button with no problem encountered.  After 40 minutes of running in reverse gear (to put some load on the engine) at 1100 rpm the temperature is running normal and the volt meter has fallen back to 14 V after reporting 14.3 V for at least 30 minutes.

... I just remembered that Mark asked me to note the RPM at full throttle to ensure that the new exhaust valve is not constrictive.  In neutral gear the engine reached 3500 RPM, which is higher than the prescribed 3200 RPM when under load.  The exhaust outflow became a pulsating steady stream but I observed no indication of constriction or build up of pressure.

Friday, June 24, 2011

A Visit to the Underworld

I'm entering the final stages to painting the stern area and I've taken the opportunity to take some photos through the opening made to accommodate part of the steering system.
Rudder at full left for port turn

Rudder at full right

The first two photos show the steering at maximum port (arms extended) and starboard (arms contracted).  The upper extendable arm connects the rudder post arm to the steering pedestal arm.  The lower arm is part of the Autopilot linear drive.  Note the blocks that I mounted to prevent over extension when steering hard to port.  (There is a similar block for hard to starboard.)

There is a photo showing the fitting for emergency steering at the top of the rudder post.


There are two photos that I took by inserting the camera into the opening (so forgive the angles).  One shows the top of the muffler and the other shows the pedestal steering arm connected to the autopilot linear drive.  You can see two of the 230 A/H gel batteries that are part of the set of 4 that comprise the House bank. 

Below those two gel batteries are to large "maintenance free" batteries that comprise the Starter bank.  These batteries were in the boat when I purchased it and are still working fine.  Originally only one was dedicated to the Starter bank but during the major electrical upgrade in New Zealand it was decided to dedicate both of them to the Starter bank, representing overkill that could be useful.
Emergency Steering

Looking Forward

Looking Forward
Second Cockpit Whale Gusher Pump
Finally there is a photograph of the second Whale Gusher pump that I took while on my back at the end of the starboard quarter berth.

Wednesday, June 22, 2011

Teak On, Foredeck Frame Completed

I arrived at the boat at 8 AM to find that Reggie had just finished installing the teak surface on the new frame around the life raft.  I taken by surprise and told him that Sergio had left me skinned for cash and I'd have to make a quick dash to the ATM.  On the way to the ATM I popped into Lopez Marine and Hamish told me to expect the Dynaplate RF grounding shoe tomorrow.

On the way to take the money to Reggie where he is working at that gigantic boat at the end of the Jetty I popped into the cabin to get the latest exchange rate of USD to MXD (Mexican pesos).  The charge was $480 USD which may seem steep but was mostly for the teak planking, which is 20 mm (4/5") thick.

We had a nice chat and I told Reggie that Mexico is supposed to be the land of Manana, but he takes it literally and delivers the next day.  He told me a bit about himself.  He sailed into Mexico 15 years ago on the way to Australia, where he planned to immigrate.  He then learned that architects and designers were no longer on the Australian preferred migration list so he figured that there was no point in sailing there there.  He's built a life here in La Paz and says that he is very happy here.   ... I think that Reggie qualifies as another victim of the La Paz honey trap.

Tuesday, June 21, 2011

New Addition to the Foredeck

Raft Off Center to Accommodate Vent
Today has been an exceptional day of great timing.

I had just poured 2 Oz of accelerant into the cup when Bob showed up just in the nick of time before I added the 6 Oz of Imron paint.  This gave us time for a leisurely talk without having to worry about the paint mixture hardening.

I was then almost finished with laying down the 8 Oz of paint when Sergio the welder and his partner Alejandro showed up with the finished stainless steel frame to fit over the life raft.  I had expected having the finished product delivered with the fitting left to me but I was pleasantly surprised when Alejandro told me that they were going to install the frame. 
Clever Latch Design

I went down to finish the last of the paint and soon heard more voices.  I popped my head out and there was Reggie the carpenter, speaking with Alejandro. Reggie turned to me and told me that he supposed that I would want a teak top on the frame and my response was "Reggie, you've just saved me a telephone call."  I supplied Reggie with a tape measure, paper and pen, and he proceeded to take measurements.

Open Position for Manual Raft Deployment
I expected to see thru-bolts come through the top of the cabin for the fixing of the frame, but they used screws and 3M 5200 bedding compound.  Reggie told me that once the 5200 sets it will not give: the top of the deck will give before the 5200 will.  I'm still a thru-bolt man at heart, but I figure that 3 screws per leg on 5200 compound will be strong enough.

The top of the frame can be lifted back for manual launching of the life raft.  The self launching capability can no longer be relied on even if I were to flip back the lid ahead of time, but to be honest, I didn't like my chances of reaching the raft after it popped up from the sunken boat in any wind stronger than 15 knots.

The new frame will provide the following good things:
Alejandro at Left, Sergio, Reggie at Right

1. I'll now be able to stand on a large and strong platform in order to reach the main halyard and sail cover at the mast.  Until now I've had to perch on two corners of the life raft knowing that one slip and I'd put a hole through the thin fiberglass housing.

2. It will provide a great seat for two people to enjoy a nice drink or two or three while lying at anchor.

3. It will provide more security to the life raft.  I've read many instances of life rafts being washed overboard along with everything else on deck during heavy weather.  This frame should hold the raft in nicely.

The cost of the frame was $664 USD which I consider good value, given that it included the design, fitting, and superb workmanship.

Reggie will return in a day or two with the teak planking for the top.  The planks will be thick with radius-ed edges and gaps between them of 3/16" for water drainage.

Thursday, June 16, 2011

Painting Progress Report

There hasn't been much to report on in the last 5 days, which have been dedicated to the quarter berth painting effort. 

I knew that I would need more paint but was reluctant to purchase an entire 4 liter can because I definitely do not want to carry any leftovers to Australia, no matter how valuable they may be.  Fortunately on Monday night I realized that my near empty 4 liter can would provide both the container and the required color for an additional 2 liters of paint, and if the same paint magician was there he would have no problem in matching the color.  Everything went like clockwork.  I showed up at 1 PM on Tuesday, there were no other customers in the shop, and I had the paint man all to myself.  He brought an empty used 4 liter can from the rear, put 2 liters of white paint in it, then started his magic show with the paint tinting.  Half way through the operation I said "perfecto", but it wasn't good enough for him.  A little squirt of this, a dash of that, a few drops of another, then it was he who said "perfecto".  He poured the remnants of my paint into the "new" can and soon I was on my way.
Starboard Quarter Berth Cleared For Painting

At this point I have finished laying the second coat in the port quarter berth and have started preparation on the starboard side.  The starboard side will be easier because there is less wiring and no engine controls to deal with.  However, it has required more preparation because there was more mold, dirt, and grease from the steering arm that protrudes into the section.  I also took a one-hour detour to identify some wiring.  Two sets were legitimate, one for the gas detector in the lazarette and the other for the gas solenoid valve. I've taken to labeling wires with "Dymo" labels: I click out the label then wrap it around the wire sticking it to itself. This seems to work fine and being plastic should be durable in damp conditions.    A third single wire led nowhere, with neither end connected.  I removed it with great relish.

At this point I've cleaned the area out with a mixture of water, detergent, and bleach.  Tomorrow I'll begin the 2-day job of removing the dried contact glue. 

The photos represent a sort of "before" and "after" contrast. 
Port Quarter Berth Painted

On the starboard side you can see the last of the glued on carpeting that I so much love to hate.  It took only 10 minutes to remove it, and will take to days to remove the glue.  The large black hose leads to the second cockpit bilge pump, which is an aluminum "Whale Gusher" which I found to be in remarkably good condition when I took it apart at my home in Darlington.  The hose lays rather flat, with no strainer at the end, in the inaccessible section below the cockpit.  I figure that the boat would have to take on an awful lot of water before the entire end of the hose is immersed.  Two, if not all four, of the batteries under the cockpit will have to be removed in order to install the Dynaplate RF grounding shoe when the boat is hard standed.  At that time I will visit the end of the hose, put a proper end piece on it, possibly reposition it in a lower part of the bilge, and definitely test it.  That box section at the rear lower right covers the steering arm which protrudes into the section.  It gives me a reasonable portal to that end of the under cockpit area.

On the port side you can get an idea of what the finished product will look like.  I will have to varnish the facing that covers the stringer and of course remount all of the wiring and fixtures.   You can see one of the two stainless steel diesel tanks, each holding 70 liters or 18.5 gallons.  Unfortunately the top access to these tanks have been blanked off and I am not able to plumb them.

The coming week will be more of the same.
Dymo Tags: On the reverse sides are "solenoid" and "detector"

However, in response to gentle nagging - Oops, I mean encouragement! - from Brenda I have obtained from Al an excellent self-paced Spanish language course of one lesson per day for 28 days that includes good audio feedback, at which time it is alleged that I will be conversant in Spanish.  (We'll see, though my past life as a Spanish speaker will give me an edge.)

Saturday, June 11, 2011

First Day at Port Quarter Berth

The photo shows the results of the first 5 hours of removal of the contact glue.  I split the two Volvo engine harnesses at the joins and suspended them and other wiring off overhead bolts using string.  I expect to finish the painting preparation tomorrow, Sunday, and to begin painting on Monday morning using the remains in last summer's 4 liter can of Dupont Imron paint.  I finished working at 12.30 PM when the temperature had passed 99 F.

Friday, June 10, 2011

Next Phase

I've had the good fortune to work my way through the task list faster than I had anticipated.  I've completed all of the "big" jobs that I've been able to do at this time.  The next major task will be the haul out of Pachuca probably in early August, during which time the boat yard personnel will antifoul the hull and install the "dynaplate" RF grounding shoe.  After that I will prepare for my visit to Kingston and Port Townsend.  This leaves the way open for 5 or 6 weeks of a painting and varnishing effort, which I like doing simply because it makes the interior of the boat look better.

This morning I started preliminary work on the port quarter berth section: removing a few fittings, cleaning the area, and surveying the scope of the job.  I won't be able to jump straight into the painting because I will take the opportunity to do remedial work, e.g. removal of fittings no longer required, filling in holes, replacing protruding screws.  For example, I found two sharp screws that penetrated the cabin from the outside.  They were screws used to fix part of the spray dodger and naughty Debbie had put in screws without checking to see if they had penetrated the skin of the boat.  I'll replace these with small thru-bolts as they should have been all along.  Also, I learned from Mark a couple of weeks ago that I can wire a non-Volvo key switch into the engine harness, replacing the terminator on the harness with a connection of the wires from the switch.  There is already a key switch on the electrical panel at the navigation station, and last week I found the key to it.  Using a multimeter I confirmed that it works OK and learned which of 3 of the 5 poles are involved.  (I'll wire the "on" and "acc" poles together.)  I'll do this wiring job while the area is so accessible.

I took great pleasure in stripping out the horrible mold culture medium fabric that covered the outboard side of the area, so tomorrow I'll begin the unpleasant and difficult work of removing the tacky glue with solvent.  Fortunately the job will not be nearly as big as the V-berth effort of last summer.  To that end I have purchased 4 liters of thinner and 10 pairs of disposable gloves.  I also finally took Bob's advice and purchased an electric fan to ventilate the somewhat confined spaces where I will be painting and varnishing.  I was willing to put up with the heat and discomfort but protecting my lungs was a different story, and that Dupont Imron paint is extremely potent stuff.  Bob even found a new shop not too far away that has fans on display.  I visited the shop and purchased a great little all metal fan for 280 pesos.  The shop is run by a very nice couple from the Basque region of Spain.
Work Area and New Fan.  (Brown Material is Dried Glue)

My plan is to paint and varnish both quarter berth areas and the section in between, but not the storage lockers because sticking the top half of myself into those confined areas to do the painting would be suicidal.  After that I will probably paint the forward sail lockers which are much more open, and will definitely paint the inside of the cupboard on the starboard side of the cabin.

... All this against a background of the La Paz summer heat.  I've been getting up at 5 AM and working on the boat until noon. After that I do an hour of computer work in front of the fan then head for the apartment for a cool shower, lunch, a nap, and of course the air conditioner.  I then return to the boat at about 5 PM.  Two days ago I returned to the boat to find the cabin temperature at 41.9 C, or 107 F.   Opening the hatches reduced those numbers to a tolerable 38.3 C, or about 101 F.   But there are advantages to this.  For one thing, paint, varnish, and epoxy dry very quickly.  I can lay down 2 coats of Imron just a few hours apart.

Thursday, June 9, 2011

Chain Locker Work

For the last two days I've been attending to the leaks in the chain locker, at the bow of the boat.  Jak and I had found out that there was some leaking when the chain locker was filled to the brim with water.

The problem area was at the horizontal edge running along the top of the rear bulkhead, underneath the lip of the opening into the chain locker.  In Hawaii I had attempted to fiberglass up to that edge but about 1/4" of the material had peeled back from the edge, due the effect of gravity.  Wally had shown me how to fiberglass a vertical wall by stapling the matting with stainless steel staples (which I was later able to pull out), but I'm not aware of any technique for getting the wet matting to hold position around a top edge. 

The "easy" fix was to empty a tube of 5200 sealant along the entire edge, but I figured that doing this would preclude the possibility of using expoxy in that area in the future.  I decided to use my stock of West System 105 expoxy resin, 206 "slow" hardener, and 405 filler to create a paste that I could apply to that edge, filling in the cavities behind the fiberglass, and hopefully getting a good enough radius on the edge to allow fiberglassing.

The sun and heat on the deck would be a problem so I was up at 5 AM yesterday and was on the boat at 6 AM, after first light but before visible sunrise.  Working underneath the lip was a challenge, but I did a reasonable job, using two batches of 6 oz of paste.  The paste kept trying to drop down and I kept pushing it back up with metal spoons and a paint scraper until the mixture had set enough to hold itself up.  At 11 AM I found that the mixture had set pretty well and the deck was still remarkably cool.  So I mixed three "mini" batches of 1 tablespoon of hardener to 5 tablespoons of epoxy, and filled in remaining gaps.

I was back on the boat at 6 AM today and had a go at fiberglassing the edge using 2" wide lengths of matting.  Unfortunately that failed because the wet fiberglass would simply not hold position long enough for the resin to set.  I abandoned that and used filler to thicken the expoxy resin into a paste and filled in any suspicious areas.

The result of the work is not neat and pretty, but on the other hand the only way to see it would be to stick one's head inside the chain locker and look up.  The important thing is that I am confident that the leaking from that area has been stopped.

I'm glad that's over.

Monday, June 6, 2011

Cockpit Instrument Work Completed

Note Autopilot on Standby
The new Garmin 152H GPS is now mounted and working fine.  I hit the unexpected snag that the stiff power cord required more space than available when the bracket was fitted on a vertical rather than a horizontal surface.  I had nothing to lose by trying to modify the plastic bracket and happily learned that the material can be drilled, sawn, and filed.  The power cable now passes through a hole that I drilled through the mounting block.

For the first time since sailing the Australian Bight on the way to Adelaide in 2008 I have the luxury of GPS readouts at the steering station.  The 152H is a pretty basic grayscale "chartplotter" which has features that I don't think that I will ever use.  I am primarily interested in latitude, longitude, course, and speed over the ground.

Power Cable Through Mounting Block

Had to Hack Into Plastic Mounting Bracket
A project like this is an exercise in patience and deferred gratification.  In this case the character builder was varnishing.  I wanted to varnish the new teak GPS mounting board to match the rest of the binnacle.  I hadn't revarnished the binnacle since Australia so I may as well do that.  And while I was at it why not varnish the new teak instrument display mounting board over the companionway?  That meant removing the displays.  I also did some filling in and revarnishing on a board to the right of the companionway.  I applied 2 coats of varnish to all under and back sides.  Visible surfaces got from 3 to 5 coats.  This varnishing effort added about 3 days to the project, but to me it was worth the effort. 

---------------------------------

While waiting for my latest three movies from the Club Cruceros library I found the paperback "Che The diaries of Ernesto Che Guevara".  This was the basis of the excellent 2004 film "The Motorcycle Diaries" directed by Steven Soderbergh. 

I'm interested in learning more about Che's idealism. ("Che was the most complete human being of our age." - Jean Paul Sartre, "Che's life is inspiration for every human being who loves freedom. - Nelson Mandela).

And besides, he was one cool looking dude in a beret


Varnished Display Panel

Saturday, June 4, 2011

Emergency Steering Handover

Note Detachable Handle for Storage
This morning Sergio and his partner visited the boat to make the final fitting of the new emergency steering.  The fitting to the top of the rudder post was a bit tight and Sergio had to work a rat tail file for 30 minutes to get a good fit.

The photographs tell the story.  Note the end piece.  I expected him to find an off-the-shelf 1 inch square fitting then weld it onto the shaft.  Silly me: Sergio made his own with great style.  

Shaft Rotates Inside Retaining Collar With Little Friction
I tied ropes to the retaining collar to demonstrate the plan, which is to secure ropes to the pushpit then to tension the system using the jib winches.  I had retaining collar put a little high to ensure that there was a downward bias when the ropes are tensioned.  You can see that there was very little clearance between the end of the tiller and the backstay.  The end of the tiller is just far enough the center of the extended rudder post to meet Montitor's specifications.  This means that in the event of an emergency there will be a good possibility that the Monitor will be able to steer the boat using the emergency tiller.

I asked the English speaking partner to tell Sergio for me that he is a master craftsman and an artist.  His partner didn't bother to pass the message on because he said that Sergio already knew it.
Stabilizing the Retaining Collar

Deluxe End Fitting

Clearance to Backstay and Plenty of Room for Monitor Control Ropes or Simply Tying Off the Tiller

The charge for the tiller was 4,000 pesos.  At today's exchange rate that's $322 Aussie dollars or $343 Greenbacks.  That seems like pretty good value to me.

While Sergio was doing the filing I had a talk with his partner about the design and fabrication of that bench over the life raft that I mentioned in the last blog entry.  They will do the job.

On that high note I'll take what's left of this Saturday afternoon to deal with a bulging laundry bag and near empty refrigerator. 

The predicted high temperature for today is 101 F, and for tomorrow 103 F.  Our cold snap of the mid-90's is over.  That suits me fine.  I love this hot weather.

Friday, June 3, 2011

Busy Week and Good Progress

It's been a busy and productive week which I can summarize as follows:

1. New binnacle GPS wired and working.  Mounting awaiting completion of varnishing
2. Storm Trysail halyard installed and track fixed
3. Autopilot up and running
4. Emergency steering first fitting, handover on Saturday

Binnacle GPS

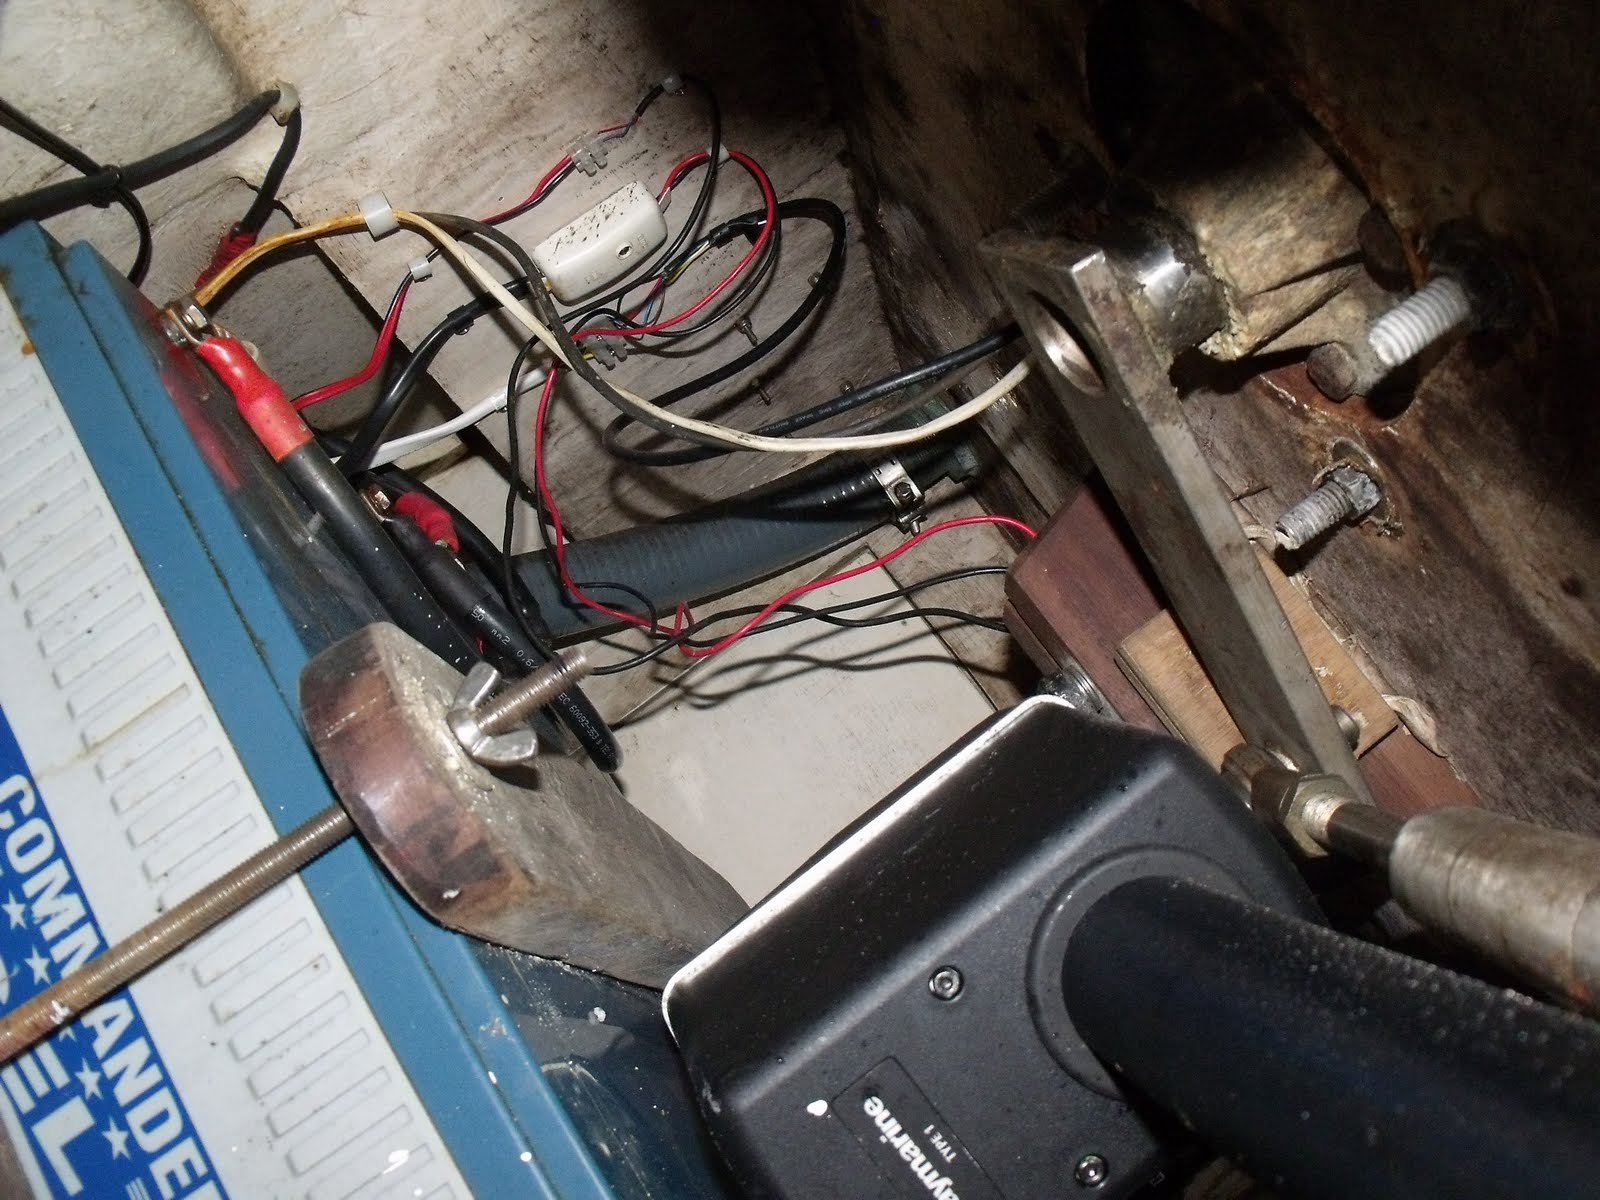
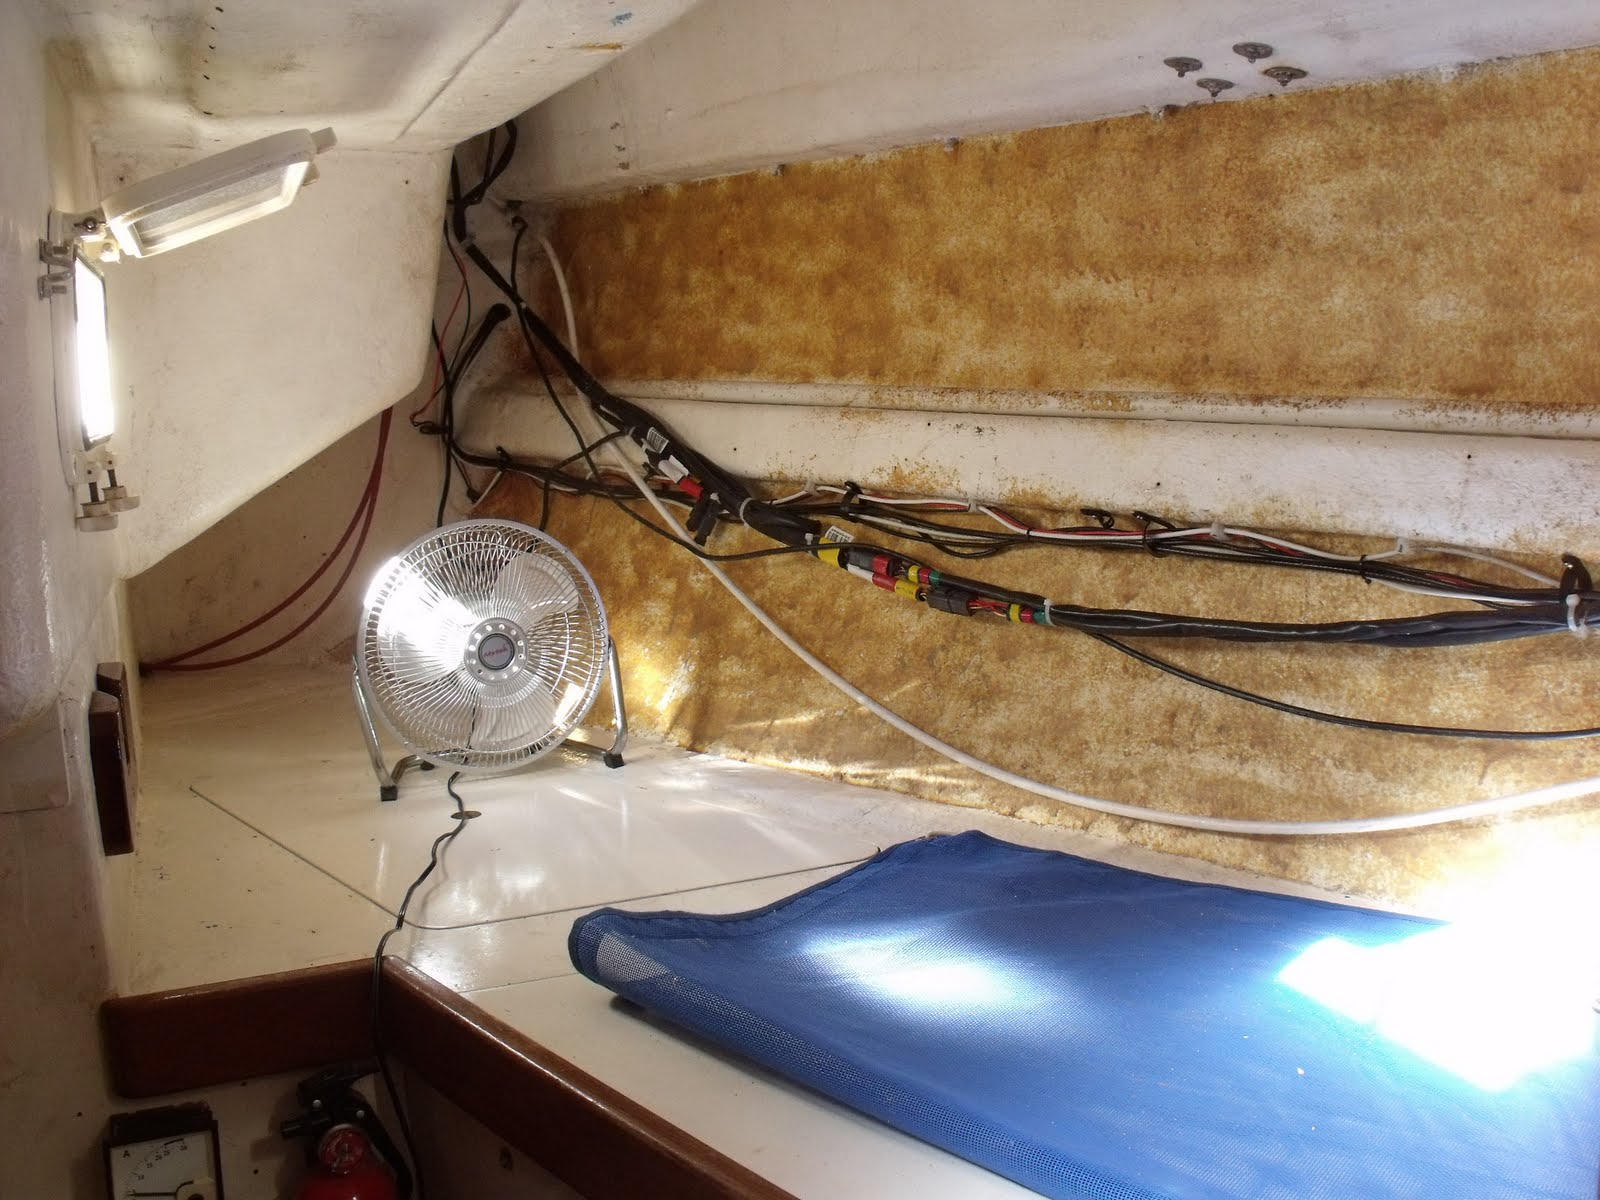
I devoted half of a day to installing the cabling between the the main panel and the binnace, relishing the luxury of being able to do the job in my own good time.  It was actually easier to provide power to the binnacle than to the display panel above the companionway which I had briefly contemplated as an easier location, because the binnacle is far enough forward to allow easy reach of the cable pathway from the doorway of the under-cockpit area.  I started the job by removing the Trimble repeater cable with a messenger cord attached, to be used to pull through the new cable.  Because the new cable had a smaller cross section than the Trimble's, passing it through the cockpit floor was unexpectedly easy.  I made the join between the GPS cable and my power cable under the cockpit, using a terminal block for the 4 wires.  I like terminal blocks: they are straightforward, reliable, and non permanent.  If I were ever to have to replace the GPS I would simply use the screws on the terminal block to remove the old GPS wires and connect the new ones.  I also spent over an hour tidying up wiring to the autopilot that was either dangling in the air or resting on the batteries. I replaced one of the two terminal blocks that was fairly corroded and mounted both blocks on the bulkhead, next to the GPS terminal block. 

I then connected the GPS and powered it up with no problem.  Actually mounting it would have to wait until I varnished the teak block that Reggie had provided and re varnished the rest of the teak around the binnacle while I had the chance.  As long as I was going to varnish I figured that I may as well also varnish that new teak piece that holds the displays above the companionway.  This meant disconnecting and removing the Raymarine displays.

Trysail Halyard

Almost 4 years after the procurement of the trysail and track, and a half a world away, I finally have a good trysail system in place.
John Preparing the Bolt Holes

John visited the boat two mornings ago and mounted the new Schaefer 3/8" cheek block on the mast, drilling and tapping 4 bolt holes.

He then turned his attention to the ill-fitting joint between the two sections of the trysail track and saw almost immediately that the upper track was lifted slightly off the mast on one side at the join.  He put a screw through the track near the join, bringing it down flat on the mast.  That removed most of the problem.  There remained a very slight left-right misalignment, but John didn't think that it was enough to cause a problem.  I would try a hoist later and if need be would use a file at the joint to smooth it more.

New Cheek Block at Top of Photo
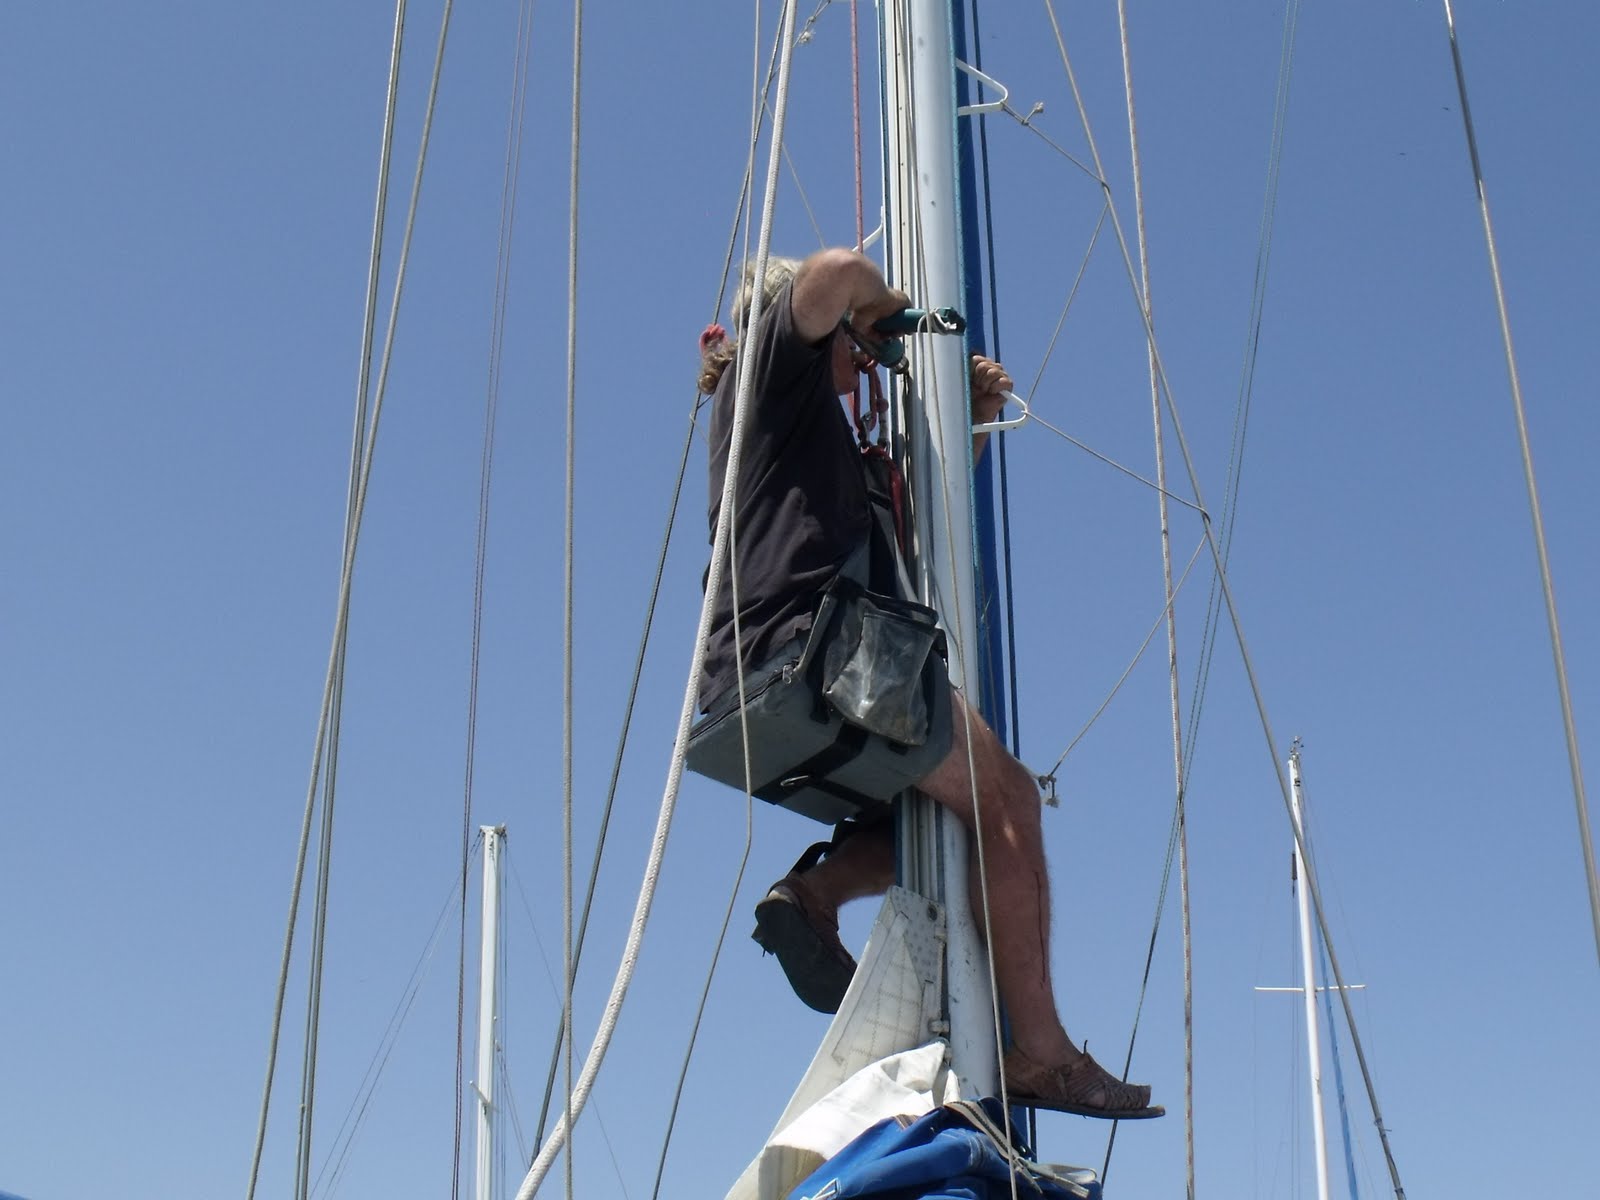
It was left to me to make the calculations and mark the halyard lines for cutting.  I marked off 120 ft of the new 1/2" line from San Diego for the mainsail.  For the trysail we would cut a length from the 5/8" mainsail halyard that was being replaced.  (That line was less than a year old and in good shape, but was a bit too short.)  Later that afternoon John cut the line and spliced the end around the new thimble in his workshop.  I had never seen yacht braid spliced before and I must say that it was a real eye opener, and as far as I am concerned it is a job for a well equipped professional.  He then whipped the other end, which is something that I could probably do, now that I know that passing a needle through the rope will not damage it.  I then returned to the boat and after a varnishing session finished off the day by setting up the new halyards.  I hoisted the end of the new main halyard to the top of the mast, round the block, and down the inside of the mast using a messenger line that I had pulled through when I removed the old halyard.  The last job of the day was to climb the mast and fit the trysail halyard around the new cheek block.  I was amazed at how little friction I felt as the line went through that new block.  I have marked this line, and John will do the cutting and whipping at his convenience.

The new mainsail halyard at 120 ft in length came up a bit shorter than I had expected.  The length is fine for reaching the winch and for moving the shackle end to the back of the boom when not sailing.  However, it just reaches the toe rail and does not meet the criterion of reaching the water so that it can be used to pull a person out of the water.  However, I have two spinnaker halyards that I can use for that role, and to deploy them would be faster because to use the main halyard I would first have to climb up part of the mast in order to remove the halyard shackle from the mainsail headboard. 
Great Job, John!

This morning for the first time ever I was able to hoist the trysail without having to climb up part of the mast in order to feed slides past the track join.  However, I learned that I have to help things along a bit by making sure that the trysail is meeting the mast square on, rather than from the side.  But I don't see this as a big problem since I can do this by hand from the deck or, if the wind is strong, steer the boat into the wind. 


Autopilot

I was able to devote several hours two days ago to mount the new Raymarine fluxgate compass and pass its cable from under the saloon table where the compass is mounted, down into the bilge, across to the port side, through the electrical panel area, and into the area behind the navigation seat where the autopilot "black box" computer is located.  This afternoon I was able to finish the job.  Connection of the 5 wires was a color coded no brainer.  Mounting the unit back on the bulkhead took some time.  I then switched on the chart plotter and autopilot breakers, turned on the C120, went to the steering station, and there was the autopilot, up and running with no complaints about lack of compass input.  A real sea trial will be required for certainty, but I am confident that all is now OK with the autopilot.

The old fluxgate compass is working OK, other than its short cable.  I'll probably take it to Kingston when I visit in the hopes of locating 5-core shielded wire somewhere, in which case I'll see if I can bribe Arnold with a couple cartons of beer to apply his skills to the laborious process of soldering each wire, shielding the join with foil, and enclosing it with heat shrink tubing.

Emergency Tiller

I expected the emergency tiller to be of industrial quality, possible of mild steel.  Instead, Sergio is producing a work of art that puts much of the stainless steel work on Pachuca to shame.  The material is highly polished and the workmanship is exquisite.  I'll publish photos when I take delivery tomorrow.

Their skill and reasonable price has inspired me to design a stainless steel bench to fit over the life raft.  This will have three functions: (1) protect the life raft (2) provide a nice place to sit on the foredeck (3) provide a good platform from which I can reach the main halyard and the zipper of the sail cover.  At the moment I get my height by standing on the corners of the fiberglass housing of the life raft, knowing that one faux paux will mean a cracked housing.  The obvious challenge is to not interfere with the ability to launch the life raft manually.  I'll see if I can also design it so that the raft will still self launch.

Storm Jib

The storm job that I ordered a couple of weeks ago has arrived at Arnold and Sandra's home in Kingston.

Blog Archive

Contributors

Statistics Click Me