This blog began in late 2006 with the planning and preparation for a circumnavigation of the world in my 39-foot sail boat Pachuca. It then covered a successful 5-year circumnavigation that ended in April 2013. The blog now covers life with Pachuca back home in Australia.
Pachuca
Wednesday, August 29, 2007
Anchors
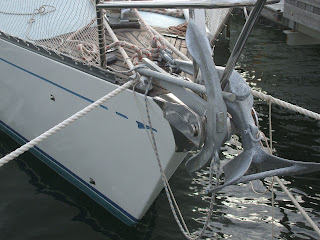
I sorted out some anchor issues yesterday to great relief and satisfaction. The main question was how to store and deploy the Swarbrick Fisherman-style anchor. Fisherman anchors are probably the best all-around anchors (e.g. they punch through weed, cling to rock crevices, hold in mud and sand) but they have gone out of favour largely because they are so difficult to store and deploy.
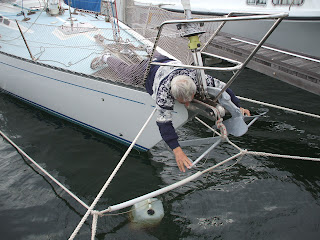
The attached photos show the Swarbrick 35lb anchor on the starboard roller next to the Manson 45-lb plow. You can see that the plow anchor can be dropped and retrieved with no interference from the Swarbrick. To deploy the Swarbrick I (1) push the anchor to where it is hanging vertically from the roller (2) pull back on the trip line to steady the anchor and also raise it a bit from the water (3) on my stomach I position the stock. When I get to the drop point I'll ease the trip line and gently drop the anchor. Retrieval is the reverse: bring the anchor up to the roller, steady it with the trip line, move the stock to the storage position, then yank the anchor onto the roller.
The stomach operation is better than it looks: easy on the back, safe because I am down low, and requires no risky movements. Approaching an anchorage in rough conditions could pose a problem, but you've got to ask how suitable would be an anchorage where the bow of the boat is plunging in and out of the water. Nevertheless if such conditions do arise I'll drop the plow anchor.
Note that the ropes were experimental only. My 38m of 10mm chain is being re galvanised. I'll probably purchase a 15m chain for the second anchor. Both anchors will have 100 meters or so of 16mm nylon rope. Also, Scotty is fabricating generous stainless steel armor for the bow to protect it from swinging anchors.
Harley Swarbrick phoned me last week to tell me that he expected to put together this week the 50lb anchor that I have ordered. The span across the arms and the length of shank of the larger anchor are less than 100mm (4") more than those of the 35lb anchor, so I anticipate no problem with putting it on the roller.
So which are the primary and secondary anchors? Who knows. I'll probably start out with the Swarbrick 35lb and the Manson plow anchors on the roller, as show on the photos. Each anchor has its advantages, so I'll drop one or the other depending on what I think is the holding ground. The Swarbrick 50lb will be a storm anchor.
One of the problems of an S&S 39 is that it is sensitive to weight at the bow because its forward section is so long and slender. That is one reason why I can't have all-chain rodes. So I'll store the Swarbrick 50lb and spare chain at the stern to trim the boat.
All peer reviews welcome!
Thursday, August 9, 2007
Back in the Water
Pachuca is finally back in the water.
Peter of Maritime Electronics finished the rewiring of the mast and reinstalled the B&G masthead unit, which had had the bearings of the anemometer replaced. Greg Hansen told me later that the anemometer now starts spinning with the slightest puff of air.
Edgar Vitte finished his mast work: new furler installed, steps installed, etc.
On the last full day (Tuesday) I decided to install a Windex wind indicator at the top of the mast because I could not see the B&G indicator and I did not want to rely solely on the display at the cockpit. Edgar pointed out that the bolt supplied was to short and a hole would have to be tapped. He kindly offered to do that. I did some of my own work by installing a gusset on the bracket holding the VHF antenna that I thought had too much spring in it.
At 2.30 PM Edgar oversaw the installation of the mast while Pachuca was still on the hard stand. When he sent the crane off the only thing holding the mast up was the tabernacle bolts, the lower shrouds and fore stay all very loose, and the topping lift clipped to the top of the cockpit steel frame. Then he climbed up the mast to start really securing it.
Once the mast was secure Edgar got mischievous and sent me up to the top of the mast to help send the new spinnaker halyard down the inside of the mast using a pull-through. I came down, we had trouble, so back up I went. Fifty feet off the deck trying to tie a bowline with one hand, the wind trying to push me backward, the thought crossed my mind that at almost 64 years of age I should be planning the next phase of my life in a retirement village. Then I looked over to Rockingham, across to Garden Island, past the Mewstone to Rotto, down to the fishing boat harbour, then to the FSC Marina and though, Nah, I'd rather be up here.
On the same day I used a thin piece of aluminium to take a template of the bow section then visited Scotty and asked him to make a stainless steel cover for the bow to protect it from swinging anchors. He practically laughed at my template and the way in which I had eyeballed the measurements of the bow with. On the last morning Scotty visited at 0800 to do his own measurements. I had calculated the top measurements at 62mm. He came up with 63mm. The lower measurement was different because we decided to extend the plate closer to the water line. Scotty said that he will use 6mm S/S plate. I told Brenda that I'm secretly turning Pachuca into an ice breaker so that we can visit Antarctica. Anyway, for Scotty it is a no-rush job for rainy days, as long as it is ready for the final hard standing before the cruise of Pachuca in December.
In the very last hour Ray delivered the S/S bracket to replace the badly corroded one stupidly made of mild steel. I have installed it so that the Autohelm 6000 will now know the angle of the rudder. I'll enclose a photo for the old and the new.
We were lowered into the water at 11.30AM on Wednesday. When the straps were cleared I put the engine into reverse and ... wait for it ... started to go forward. Donny had questioned the strange setup on my SABB engine and we had decompressed the engine and turned it by hand to see which way he should set up the shift lever. We made a bad call. I hit reverse hard in the lifting pen and the prop walk swung the boat to the left. Basically I did a 180 degree turn where I shouldn't have but we got through it with a lot of help from the lifter crew. At 12.30 PM I visited Martin at DeGroot to tell him about the problem. At 2.30 PM Donny was on board to fix the linkage. While he was there he checked out the stern gland which was putting out one drop every 15 seconds. He tightened it up and pumped in quite a bit more grease.
Yesterday I met Edgar at the boat at 8 AM and we put up the boom and mainsail. He then put on the 8mm line on the head sail roller. I had been using 8mm line because the old Hood drum was too small to take anything thicker. The new drum is bigger and Edgar showed me that the entry hole should be able to take a 10mm line. I visited Yacht Grot and got Kursty to replace my 24.5m 8mm line with 30m of 10mm line. I installed the new line with no problem. I then put in a lot of time using two blocks shackled to the toe rail so that the reefing line no longer rubs on anything when it is taut. The new setup will be good. The 8mm line would not self-tail on the winch which meant that rolling in the head sail was a two-handed job. (Oh, the difficulty of modern sailing!)
I am attaching photos of the new mast setup. You'll see the new steps, radome support bracket, and at the very top the new Windex, lightning diffuser, and VHF antenna.
I forgot to get a photo of Scotty's excellent work of three more antenna stands at the stern of the boat. At the top of the frame just in front of the davits I've got a regular antenna farm of 5 equidistant antenna stands.
Now the bills have started to come in. (Gulp!)
Pachuca Progress
The following is my report of 7 August:
I'm home for an overnighter after another 6 days in Fremantle.
At Arnold's suggestion I shortened the chain plate lightning ground cables to eliminate some large loops. My biggest concern was crimping the new lugs. That turned out not to be a problem. When I purchased the electrical lugs the man at Wilson Marine loaned me a bolt cutter sized crimper. I also received my 7" by 3/8" stainless steel bolt (at a cost of $29!) and finished finished the grounding of the mast. Photo 170 shows the chain shortened chain plate cables, photo 171 shows one of the two mast grounding cables.
A big win for me was the removal of a heavily corroded bracket clamped on the steering post. Its purpose is to send the angle of the rudder to the Autohelm 6000 self-steering system. Some turkey had decided to use mild steel for the bracket, and years later I paid the price with hours of effort while wedged between the batteries and the cockpit floor. I expect a stainless steel replacement on Wednesday. See photo 172. It is glistening because after chipping away as much corrosion as possible I saturated the bracket with a lubricant spray.
Another win was the lower drain holes for the anchor well. You can see at photo 176 the new hole next to the plugged-up original hole. Note the thickness of the hull. Photo 177 shows the hole lined with Sikoflex and plastic tubing, and screw holes filled in. Photo 178 shows the finished product, the lower, larger stainless steel drain cover. This was a big one for me. It was unacceptable to have anchor water draining into the bilge.
The mast is ready to put up: Profuler jib roller furler installed, radar dome support bracket and wiring installed, VHF antenna and cable installed, mast steps installed, new lights and cabling installed, lightning diffuser and anemometer to be installed when the mast is put back up. See photo 186
The mast is scheduled to be fitted back on Pachuca on Tuesday afternoon. I'll arrange to have Pachuca lifted into the water on Wednesday. If this goes to plan Pachuca will have been on the hardstand one day short of 4 hard, expensive, but very productive weeks.
I cannot resist including a shot of Pachuca's hull. I guess that I'm biased, but to me that hull looks like a thoroughbred built to punch through any seas at a great rate of knots.
Subscribe to:
Posts (Atom)