This blog began in late 2006 with the planning and preparation for a circumnavigation of the world in my 39-foot sail boat Pachuca. It then covered a successful 5-year circumnavigation that ended in April 2013. The blog now covers life with Pachuca back home in Australia.

Pachuca

Pachuca
Pachuca in Port Angeles, WA USA

Saturday, April 20, 2019

Progress Photos

We have made some progress with the galley sink.  Bruce and I visited a caravan (trailer) shop and purchased a very high quality (and high price!) tap that has a high rise, swivels from side to side, and has excellent control knob.  Later that day I purchased a set of 10 flat seals and trimmed three of them with sharp scissors to fit under an extra plate supplied with the tap to cover the hole through the counter surface which was wider than the new tap.  The next morning I visited Bunnings and with the help of one of their staff put together the necessary pieces to connect the threaded tap to the inlet hose. 
Area painted and new thru-hull fittings in place

Section of compression post above the deck
Here is a photo of the section that passes through the cabin of the newly painted mast compression post that we fitted two weeks ago.

Section of compression post inside cabin

Bruce has made progress with the keel.  He is fairing (smoothing) the surface of the keel to near racing boat standard.  I did not expect this quality of work but Bruce has put in a lot of effort to do the job to his standard. One photo shows the port side of the keel with green filling that has been sanded smooth and the other photo shows the starboard side which has already been filled, sanded, and coated with two of the four coats of "International Interprotect" epoxy primer that it will get.
Port side of keel filled and sanded smooth

Starboard side of keel after filled, smoothed, and primed

Friday, April 12, 2019

Tung Oil

After sanding the teak decking about a month ago I began to think about finding something that would protect the decking and prevent it from going grey.  The few products available in the boat shops seemed expensive with little information about what was actually in the material.

During an internet search I kept seeing references to tung oil, as though the percentage of tung oil was the barometer of efficacy.  That led me to a look at pure tung oil and for various reasons concluded that it was worth a try and located a supplier in the Perth area: Carbatec at 1/168 Balcatta Rd Balcatta. I elected to purchase 4 liters rather than 1 liter of "Oreganoil" tung oil for the usual reason that a 4-liter can is much more cost effective than a1-liter can.

The use of pure tung oil seems to be very rare among the local boating set so for us it would be a big learning experience.  I write "us" because Bruce's wife "Dolphie" wanted to work with me to pick up a new skill. 

We decided to use the teak work over the anchor well for our first experiment.  We laid down a coat of pure tung oil which turned out to be a mistake because it did not dry even overnight.  I did some more research and learned that the name of the game is to get as much penetration into the wood as possible by diluting the initial (or all) coats.  I made another trip to Balcatta and purchased 4 liters of Oregaoil "Citrus Turpene" which is the recommended solvent for various reasons.

The next day we used a mixture of 50% tung oil and 50% citrus turpene and got excellent results both in salvaging the initial work over the anchor well and with new section of teak in front of the companionway and the back seat in the cockpit.  On the new sections the mixture was absorbed quickly and was dry within the 20 minutes stipulated by one web site.  The next day we laid the second 3rd coat on the anchor well cover and the 2nd coat on the new sections.  On Friday morning we laid the third and final coats on the new sections.  We had discussed whether or not to use undiluted oil on the last coat as Carbatec had advised but took Bruce's advice to keep using 50-50 solutions until we were happy with the result.


The pure teak oil and thinner are obscenely expensive (but what isn't in the boating world?), but material has two thing going for it: (1) the oil and thinner go an awfully long way, (2) there is the prospect of the one treatment lasting a long time. 

Knowing what I know now, 1-liter cans would have probably been sufficient but the material will store well and I have now probably a lifetime supply without ever having to chase down the material again.

Regarding durability, Wikipedia states "The Chinese have used tung oil, also known as China wood oil, for at least 2500 years for building waterproof boats and paper parasols, wood finishing, wood waterproofing, caulking, inks and paint." Another site states "The oil penetrates into the wood, providing a relatively hard surface that repels water, giving it a waterproof finish. Another bonus is that tung oil seeps into the grain of the wood making the grain pop. ... When tung oil is not thinned, in other words, its 100% tung oil, it's a non-toxic finish." (Note that the "citrus turpene" that we are using is also non-toxic other than the wonderful citrus scent attracting bees to the boat in just minutes.)  The Carbatec site states:  "Tung oil is one of the few oils that are classified as ‘drying oils’. Other oils that fall into this category are linseed, walnut, soybean and poppyseed. A drying oil is an oil that hardens to a tough film, not through evaporation of the solvents as many finishes do, but rather they undergo a chemical reaction when exposured (sic) to air."

(Caveat emptor: One can of remarkably cheap deck oil stated "Contains pure tung oil" which is not very useful if the percentage of this pure tung oil is not stated.)

Now that I feel confident with tung I expect to treat the cockpit floor and seats with little difficulty.  All I will  require is three successive days without rain.


Head Job

I reported earlier on the woeful state of the platform supporting the marine toilet in the head. 

Bruce did his usual outstanding job of designing and building a new support as well as preparing the floor for painting.  The work was not as easy as it sounds and required a good knowledge of glues, fillers, and coatings. 

New framework in place

New base in position.  Note access to space below.

Head painted and ready for new toilet

Early in the week Bruce gave me the "all clear" for moving in and painting the area.  I had already prepared, primed, and painted the ceiling  bulkheads and various recesses with the usual "No Rust" primer and two coats of "Northane" 2-pack paint.  By Thursday evening the toilet and floors areas were painted and I handed the head back to Bruce for procuring and installing a new marine toilet. 

Galley Sink

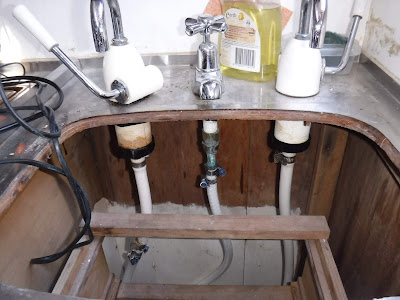
I agreed with Bruce that we would replace the galley thru-hull fittings and hoses.  One fitting is for the sink drain and the other is for the manual salt water pump.  The salt water fitting was in surprisingly bad shape given that it had been installed in Mexico in about 2011. 
Access to plumbing after removing the sink

Ready for new thru hull fittings

But as usual there was mission creep.  The fresh water tap was loose so we removed the entire sink so that we could access the connections.  Bruce examined the connector between the sink and the drain hose and discovered that it was loose and leaking.  I also grumbled about the tiny fresh water faucet that did not give sufficient clearance for pots and pans.  Bruce procured a stainless steel connector and is having it welded to the sink to guarantee a trouble-free connection.

We have looked through catalogues for a faucet with a high rise and outlet that can be moved from side to side and  expect to make a procurement in the coming week.

In the photo, the fresh water hand pump is to the left, the pressure fresh water in the middle, and the salt water hand pump to the right.  The pressure fresh water is from the starboard water tank.

I took advantage of the wonderful access to the area now that the sink had been removed to repaint it with one coat of "No Rust" primer followed by one coat of "Northane" 2-pack polyurethane paint.

Once the kitchen drain work is done we will have replaced every thru-hull fitting on the boat (and associated hoses) on the boat.

Compression Post back in position

We reached a minor milestone by fitting the compression post, which supports the mast and passes the load through the deck to a plate on the cabin floor which passes the load directly to the keel via a welded tubular section which rests on a specially manufactured spacer.  The cabin floor plate had been manufactured and powder coated months earlier.
Resting place  of compression post

Passage through deck into cabin

Boat yard crane bringing compression post into position

Post in position, Bruce doing his thing

Water seal from plumbing supplier.

Compression post in position and ready for the mast

Bruce had done much work on the thru-deck opening, building it up for a tighter fit and saturating the wood with Everdure epoxy primer.  He also prepared small jarrah wedges to ensure that the compression post was in a firm fit and not more around.  This represented a great improvement because there had been no wedges and the part of the wooden collar had allowed too much sway room, even though throughout the circumnavigation I had not noticed and movement in the mast.


On the day the boat yard crane was used to lower the post into position, with Bruce working above and me below.

Bruce had also procured a conical sealing boot from a plumbing supplier, cut it to length, and fit it into the compression post before we lowered it into the cabin.  We think that this new boot will eliminate much of the water that had been entering the boat when sailing hard upwind.

He finished the job by putting sealant under both ends of the boot and clamping it.

Refurbished Turning Blocks

The turning blocks is typical of the detours that have delayed the project.

The turning blocks redirect the sheets (ropes) from jib, staysail, and spinnaker to the cockpit winches.  They endure enormous loads hour after hour when the sheets are tensioned hard using the maximum strength of both arms applied to the winch handles.
Cracked coaming gel coat on starboard side

Duralac corrosion protection for backing plate

Ready for reassembly

Refurbished turning block in position

The sheaves of the starboard block were jammed and it seemed like a simple job to remove both blocks, take them apart, and lubricate them.  They both proved to be in bad shape and we refurbished them by having new centers fitted to the pulleys and having the plates re anodized. 

The coaming of the starboard turning block showed evidence of strain with cracking on the outboard gel coat and an actual crease in the coaming.  We corrected the problem by replacing the 2mm thick interior backing plate with a heftier and larger 5mm plate and adding a 3 mm plate on the outboard side of the coaming.  Thus that section of the coaming would be sandwiched between the two stainless steel backing plates. I also sanded the teak mounting blocks with 2-pack varnish.

The machining, anodizing, and unexpected problems in re mounting the blocks cost us a total of about 1 day's work spread over a week but the result was very good and made the effort worthwhile.

Blog Archive

Contributors

Statistics Click Me