 |
| Mixing the Epoxy Bedding Compound |
He first removed all of the numbered boards then cleaned the fiberglass and teak contact surfaces with acetone.
 |
| Spreading the Bedding Epoxy |
 |
| Screwing Down Board on Bedding |
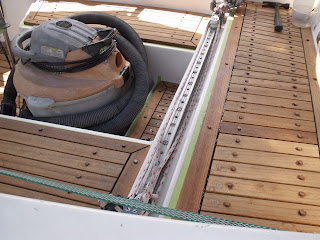
The "glue" that Reggie uses to fasten the teak to the fiberglass surface is a 2-part epoxy. The material is thick and gooey and Reggie mixed it using a shore powered electric drill with a special attachment. He mixed only enough for about 1 hour of work because the material hardens relatively fast. He began at the bow, using a spreader to lay down an area of compound, then lay the appropriate boards down and screw them down using an electric drill. After completing the work on the bow he removed the door to the chain locker lest stray glue bind the door to the frame. He then moved to the cockpit where he bedded down the sole. His assistant supported by laying down globs of bedding where required, preloading the boards with screws, handing to Reggie the next board to be laid, etc.
 |
| Tapping in the Plugs |
After this effort Reggie took a well deserved break. We got into his SUV and picked up 3 more tubes of caulking at Lopez Marine then visited a car parts shop where he selected a 3 meter long strip of wonderfully compressible rubber trimming with a profile of 24mm x 8mm which he thinks will do nicely for sealing the chain locker door. He plans to attach the rubber using teak caulking.
 |
| Proud Plugs Ready for Sanding |
After Reggie finished I remarked that this work could result in a disaster if attempted by an incompetent. Once the teak is down it is down for good, so it has to be right the first time. If the plugs do not make a near perfect fit they can either split the teak or leave unsightly gaps. (Don't worry about the future. Reggie figures that the teak decking will be good for between 30 and 40 years.)
At this point it was only 11:30 AM and there was nothing more that Reggie could do until the expoxy around the plugs dried. I was glad to see him go and hopefully relax for the rest of the day.
I then made a belated inspection of the ceiling below the cockpit and saw that many screws had protruded in sections of the cockpit seat and sole that did not have a plyboard core (mainly along the edges). This did not bother me too much because I had told Reggie that his job came first and I would deal with any screws that showed below. (I'll probably grind them down after my return to Australia.) I was sure that Reggie had told me that the modern technique is to hold teak down with glue only and no screws. I asked Reggie about this today and he told me that he used screws to deal with the thinner non-cored areas of the decking. However, he had placed the screws much farther apart than the usual 1 foot.
I then peddled over to the immigration department where I was asked to return late next week to their new premises. That will have made 6 visits for a process that should have required 2 visits.
A few days ago I received my quotation from the boat yard - actually "La Marina del Palmar" rather than Abaroa's next door. (They are both owned by the same family.) It came it at a whopping $780 USD for the liftout, cleaning of the hull, 3 days on the hard, and application of 2 coats of antifouling that I will supply. The quotation for the installation of the Dynaplate was $185 USD which I consider to be more reasonable. (Remember that I am not allowed to do any external work on the boat while it is in the boat yard - the yard staff must do it all.) However, I returned yesterday afternoon quotation in hand and produced a 30% haul out discount that I had won at the Bay Fest event a few months ago. That dropped the haul out package cost from $780 to $546, a saving of $234 USD. YES! Ya Gotta Win A Few.


1 comment:
Wonderful progress!!
Post a Comment