This blog began in late 2006 with the planning and preparation for a circumnavigation of the world in my 39-foot sail boat Pachuca. It then covered a successful 5-year circumnavigation that ended in April 2013. The blog now covers life with Pachuca back home in Australia.

Pachuca

Pachuca
Pachuca in Port Angeles, WA USA

Saturday, November 24, 2018

Bad Hair Day

Bruce and I are now working off a task list of 33 items, which has been helpful in our scheduling preparatory work.

More work was done on bow roller modification.  Angle plates were welded at the bottom to facilitate the feeding of the chain when weighing anchor.  Lock down pins were fabricated and the fitting of the pins will be completed next week. 
Two of four pin holes have been drilled

No more of anchor chain jumping off roller
The first photo shows the plates that have been welded to the system to keep the chain on the roller and locked down by a pin.

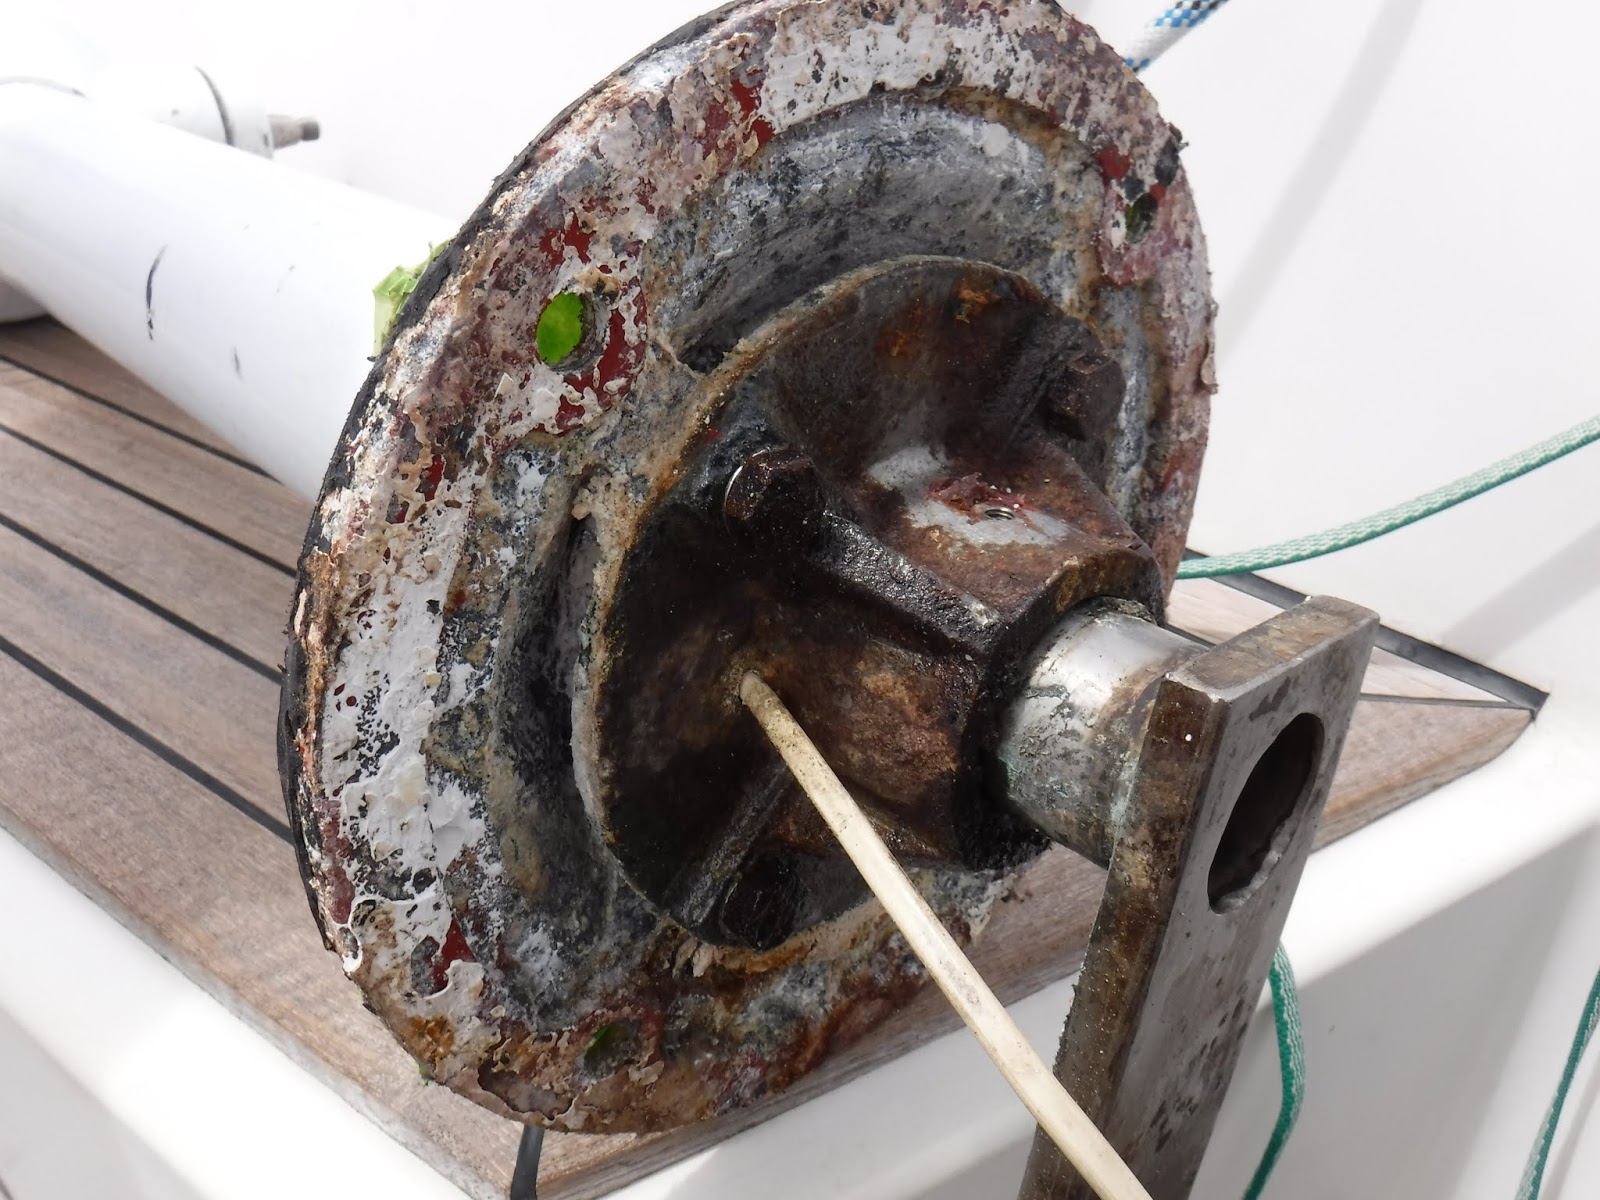
The shaft seal was reinstalled.  The company was able to reface the seal so I was not forced to purchase a new one.  On Friday Bruce re fiberglassed the end of the stern tube and on Monday the seal job will be completed by clamping on the bellows (ie rubber boot).  The mechanic will also re align the propeller shaft which for some reason is out of position.

Contact was made with a gas fitter who will replace the boat's LPG gas lines probably in January.

Now that the transom fittings have been bolted on Bruce has arranged for the boat's stern lettering to be put on in the coming week. 

Bruce and I did a lot of painting during the week.  I spent a difficult 3 hours laying down a coat of enamel paint in the lazarette, which I liken to painting the inside of a coffin with the lid down.  After the cramped work I emerged with my hair covered in lumps of enamel paint, some large, and some small and difficult to see.  I spent the rest of the day looking like Albert Einstein on a bad day and resumed the painting the next day armed with a pair of underpants to protect my hair.  I didn't relish the prospect of being seen wearing a pair of underpants on my head and was fortunately saved by the bag of rags that we had purchased earlier in the week.  One of the rags was large enough to act as a suitable head scarf.

The situation appeared to be so hopeless that I considered shaving my hair.  Fortunately a Google search came up with olive oil as the solution.  On Friday night I cut off about 10 lumps of paint with scissors while watching TV then on Saturday morning I saturated my hair with olive oil to the point where for the next 4 hours I had to have a towel around my neck to manage the oil that was working its way down all around my head.  During these four hours worked at the garage as usual, then when I was ready for a shower I soaked a bit more olive oil into my hair and got to work with a comb. Sometimes I could slide the lumps down with the comb and sometimes I would have to work the lump between my thumb and index finger until it seemed to fall apart.  Twenty minutes later I could pass my comb and hair brush through my hair with no snags and the crisis was over.

Mark the mechanic spent several hours doing maintenance on the engine. The coolant hoses have been replaced with proper ones, the coolant has been replaced,  and the heater has been fitted.  The gear box oil was at the correct level and looked good.  He will return next week to finish his work after Bruce's fiberglass work has set.
Adjustable LED light at top right


I am enclosing a photo of the steerage area with its floor board at LED light at the upper right.

Saturday, November 17, 2018

Binnacle Work Completed


The Cobra steering pedestal came back from the spray painter looking as good as new. 


New Scanstrut instrument pod

Rear View


We then assembled the binnacle on Thursday morning and concluded that the legs of the new stainless steel frame were too short because the instrument pod prevented the full opening of the compass cover and obstructed access to the drinks holder. Greg and I removed the frame without disturbing the steering pedestal or teak wood work then Bruce and I returned the frame that morning with a request that 100 mm be added to the vertical tubes and the slot for the wiring be lengthened by 20 mm.  By noon the next day we had the revised frame on board and Bruce had no trouble sliding the feet through the teak holder.  Greg arrived after lunch and spent the afternoon mounting the instrumentation.

The binnacle work had cost an obscene amount of money and effort but the result was most satisfactory.  We had solved the problem of mounting the Navman GPS onto the instrument pod by having Zelko fabricate and ingenious wooden support that would be screwed onto the surface of the pod.  The photo shows the autopilot panel on the left, the Navman GPS in the centre,  and the anchor windlass switch at the right.  (It was the problem of siting the new windlass switch that had led to the re design of the binnacle in the first place.)  The instruments are now all fully protected from the weather and the cabling is invisible, passing from the inside of the pod pod down the legs of the frame.

During the week Greg also installed a bright adjustable LED light in the steerage section beneath the cockpit, with the switch at the navigation station instrument panel.  What luxury!  A nice piece of flooring too keep me out of the bilge and a bright light to see what I am doing is a far cry from the section being a no-go area protected by a wall of batteries.

My attempt to connect the boat to shore power failed with a light on the new panel indicating incorrect polarity.   Greg took the cable home and swapped the non-standard connector that I had been forced to use with my old boat wiring with a standard (and legal!) one.  And, shame on me, Greg confirmed that I had wired the plug incorrectly with polarity reversed.

Bruce and I re mounted the boat's stainless steel nose plate.  It was a perilous job that could have ended in disaster with the slightest mistake but we managed it with no dramas.  Bruce's wife "Dolphie" had done a marvelous job of treating the metal with Ranex  rust converter then polishing it to a high luster.  It was the original nose plate, which showed the scars of previous battles with anchors, but to me it added character to the piece.
Applying Sikaflex to the bow plate

Plate in position

One day Bruce noticed some deterioration in the rubber boot and clamps around the PYI dripless shaft seal that had installed in Mexico in July 2010. A mechanic was called and removed the unit and noted some pitting on the metal face.  He took shaft seal away either refacing or replacement.  The rubber boot and clamps will be replaced, and Bruce will do some repair on the fiberglass at the end of the stern tube. 

We then had to remove the base upon which the engine covers slides in order that he may sleeve  two holes in the bilge barrier at the  front of the engine compartment.  That led to another day of distraction typical of this project.  We cleaned the oily area below the engine so well that I had to finish the job of removing dry specs of material using a vacuum cleaner.  We then found the beginnings of wood rot in parts of the engine cover assembly so we cleaned, sanded, then treated the wood with several coats of "Awlgrip".  In lifting the base one of the layers acting as a slide for the cover parted and we saw that it had been held together with tiny nails and a layer of Liquid Nails, something totally unsuited for a marine environment but was probably the standard when the boat had been built in 1983.  We put the base back into place, used 2-part "Megapoxy" to re glue the slide, then put the engine cover  back into position to ensure that aligned the track correctly and to apply force to the glued surfaces. 

We had a look at the engine while it was exposed and noted that once again the rack holding the oil filter had become loose with the top bolt loose and the bottom bolt missing altogether.  After some discussion I agreed to bring in an experienced Volvo mechanic that Bruce knew.  The next day the mechanic visited and we had a very productive discussion on the engine and how to manage it.  I have commissioned him to service the engine, which will exclude an oil change which he deemed unnecessary since fewer than 10 hours have been put on the engine since I changed the oil and filter less than a year ago, and the oil looked brand new.  I will also engage him to align the propeller shaft after the boat is back in the water.  One thing that I liked about the man is that he had no hesitation in explaining anything I asked, such as how to change the engine coolant.
Accessible Engine

550 hours of running since installed in Mexico in Jan 2011


Both the mechanics attending to the shaft seal and the engine both marveled at the accessibility of the boat's engine and propeller shaft.


Sunday, November 11, 2018

November Report 2

Pachuca's steering station has two components: the steering pedestal to which is attached the wooden binnacle which supports the compass. 

The Cobra pedestal steering is an all-gear system that is considered to be more reliable than chain or wire systems.  During final preparations for the circumnavigation in 2008 my friend Reg Kelly suggested that we remove it from the boat and have it checked out, and what wise advice that turned out to be.  We managed to remove it and deliver it to a local engineer who took it apart and found it to have a frozen bearing and totally dry of lubrication.  When  I picked it up a grease nipple was pointed out to me but after  the installation of new batteries in New Zealand I very rarely got access to the below-cockpit area for greasing the bearing.
After pedestal removed

Base of pedestal looking very sad

Two weeks ago we removed the unit and found it to appear to be in  bad shape with corrosion starting to eat into the aluminium base.  The bearing  was found to be in bad shape although not corroded, and it appeared that ordinary rather than marine grease had been applied in 2008.  After picking up the refurbished unit we sent it  out for re painting.  The spray painter had done a beautiful job and the unit presented as new. 

By then we had decided have the stainless steel binnacle rebuilt, to be higher and have a bend at the top for better presentation of the instruments.  I agreed mount a Scanstrut instrument pod which would look smart and protect the instruments from the elements.  The pod would also enable us to pass the instrument wiring down the legs of the binnacle rather than down the side as before. We then had difficulty in mounting the stand-alone Garmin 152H GPS which had not been designed for this kind of mounting but we came up with a solution utilizing the woodworking skills of Zelko.

So the instrument pod will accommodate the Garmin GPS in the centre, the Raymarine autopilot head at the left, and the anchor up-down switch at the right.

And last week Bruce and I managed to reinstall the boat's stainless steel bow plate.  The job took a lot of time and patience but fortunately there were no catastrophes.

Saturday, November 10, 2018

November Report 1

Five weeks have passed since my last blog entry.  In this entry I will cover the electrical work of the last few weeks.

Greg Hansen has almost completed what has turned out to be an almost total wiring of the boat which included the following:

1. Re-design of the anchor windlass power system
I had earlier accepted Greg's advice to alter the anchor windlass setup from from supplying electrical power from small battery at the bow that is trickle charged from the house bank to supplying it directly from the engine starter battery via heavy electrical cabling. 

There would be several advantages from the change: (1) Power would now be supplied from a hefty starter battery rather than a smaller AGM battery more suited for supplying steady power rather than starting engines, (2) The cost of the cabling would in the long run pay dividends because there would no longer be the need to replace windlass batteries, (3) Because the windlass would always be worked with the engine running there would be no practical limit on the frequency of anchor lifts whereas the old system had limitations since it relied on a slower trickle charge to replenish the windlass battery, (4) There would be less weight at the bow of the boat, a big benefit to Pachuca with her long and slender bow.
Rewired Windlass


It broke my heart to dismantle the trickle system because it represented a personal triumph of design and implementation.  My brother Arnold, an electrical engineer, supplied the design then Stephen used an amazing on-line simulator to see the behaviour of the circuit using various resistors, diodes, and the relay.  Stephen also provided a large heat sink which nicely took care of heat issues.  But we all agreed that the sacrifice of the good work was justified.

After confirming that the Orca VE 2000 windlass could reverse to drop as well as raise the anchor Greg installed the required wiring which included a heavy breaker at the navigation station.
Windlass Breaker

In future I will be able to raise and lower the anchor from the steering station, yielding great improvements in efficiency and safety.  But that led to the problem of finding space for mounting the new switch at the steering station, which led to a rebuild of the binnacle documented later.

2. Re-wired all of the battery cabling

Two of the house batteries and the starter battery had been re positioned to the starboard quarter berth locker which necessitated a lot of cabling work.  While he was at it Greg replaced the cabling between the two house bank batteries in the cabin.  During this work Greg suggested that we split the four house bank batteries into two separate banks in order to minimize the risk of one bad battery bringing down the entire house bank.  The cabling work included running special wires to the BEP voltage and amperage monitor, which I modified to display voltages for "HOUSE 1", "HOUSE 2", and "STARTER".

3. Replaced all of the internal 12v lighting  

All of the internal lighting is now LED.  Dome lights were installed in the aft bunk area, clothes locker, head, and navigation station.  For the first time I am able to use a red light at the desk when navigating at night.  Large LED lights were installed in the cabin and galley, and new high quality brass lights were installed over the cabin bunks and forward V section bunk.

4. New Switches 

A new switch allows me to direct power from the solar panels and wind charger to either house bank, and another one which allows me to use power from either house bank.  (House Bank 1 is the two batteries aft rated at 480 a/h and House Bank 2 is the two batteries in the cabin, rated at 540 a/h.) Note that the starter battery is charged solely from the engine alternator, and when it reaches full charge a voltage sensitive relay directs the alternator charge to the house bank.
Switch to direct solar and wind power

Switch to select which house bank to use


5. New lighting

Wiring has been set up for new lights at the cockpit and in the space below the cockpit and Greg expects to receive and install the new lights in the coming week.

6. Upgraded the 240V wiring to current standards

 Greg was legally and ethically obliged to upgrade the 240V AC system to current standards and I certainly did not object to that.  He put the heavy cabling in conduit, installed an RCD, and neatened the entire setup.

6. Installed an electrolysis blocker

Electrolysis Blocker
Greg installed an electrolysis blocker which will allow me to connect the boat to shore AC power with no fear of electrolysis due to faulty wiring of the shore power source.


7. Tidied Electrical Panel

Greg did a marvelous job of removing redundant wiring then tidying up the main electrical panel.  He also replaced switches with breakers in a new extension panel that I had installed on the door. I sacrificed the ancient (but working) Lowrance GPS in order to accommodate the panel for the 240V A/C breakers.

I finally have for the first time a very good understanding of the boat's wiring and plan to document it at first opportunity.
New switch panel lower left, A/C breakers at right

Wiring now tidy and and labeled

Blog Archive

Contributors

Statistics Click Me