This blog began in late 2006 with the planning and preparation for a circumnavigation of the world in my 39-foot sail boat Pachuca. It then covered a successful 5-year circumnavigation that ended in April 2013. The blog now covers life with Pachuca back home in Australia.

Pachuca

Pachuca
Pachuca in Port Angeles, WA USA

Monday, December 30, 2019

Day Sail

On Friday 27 December I took the boat out in the company of fellow sailor and friend Peter Austin with his wife Lynne.  We sailed to the south along the shipping channel then dropped anchor at Woodman Point for 90 minutes of lunch and relaxation.
 
Lunch Aboard Pachuca

The SW wind had been stronger than expected and we sailed with one reef in the main and perhaps a third of the headsail rolled out. We had water over the deck which brought out two things, one good and one not so good.

The good news is that after starting off with a bone dry bilge I found about one spongeful of water in the bilge when we were back at the pen, which could have been easily been caused by water loosened up during the sail.  I say that because it took me about 2 days to dry the bilge after I had discovered that two of the drain tubes between the bilge sections were still plugged up, and the water kept seeping into the bilge for 2 or 3 days after I removed  the plugs. 

The not-so-good finding is that the new you-beaut solar vent over the head cannot be removed and replaced by a plug like the old one, as far as I can tell. The water was skating along the deck then going into the vent and down into the head. This is completely untenable for heavy weather sailing and on my next visit to the boat I will have a better look at the setup.
 
Once again the boat performed very well.  However, we did discover that the boat had drifted perhaps 100 meters in spite of 30m of chain having been put out.  This was no doubt due to the sea grass on the ocean bed and has made me consider replacing the 35kg Delta anchor with the heavier 45kg Manson anchor. But this may be moot because as Brenda pointed out later, there is no need to disturb the sea grass when the club has two moorings available for its members (one of which was free during our visit).

Sea Trial

On Saturday 14 December we took Pachuca out on her sea trial.  I was accompanied by Ron Viney an experienced sailor and good friend whom I have gotten to know during our years of participation in the club's annual Bunbury Cruise.

Ron arrived at the boat at 9 am sharp and at 9.30 we were under way using the motor because the wind was so light.  The first test we did was to motor the boat in a 360 degrees circle to confirm that the autopilot's flux gate compass was working correctly. At the shipping channel we hoisted sail heading south and by the time we reached the southern end of the channel we were  under full sail: mainsail  all the way to the top and genoa fully rolled out.  It was all very pleasant because the apparent wind was only around 14 kts. 

We then turned around and sailed to Woodman Point where with Ron at the bow watching things I dropped anchor over a sand patch using the new control system where I can both drop and raise the anchor from the cockpit. The new winch and control performed brilliantly, which was the highlight of the sea trial.   I was amazed at the speed of chain travel from the new winch.

There were some procedural stuffups because it had been about 2 years since I had sailed the boat, but in general things went very well.  There was a problem with the connection of the mainsheet to the traveller (since corrected) and Ron pointed out that the jib sheets were too short for the larger genoa sail, estimating that I would need sheets 3.5 m longer. The following week I purchased a new  port sheet 13mm in diameter and16m long, with the starboard sheet on order.  

This successful sea trial marked the end of the difficult and expensive 15-month refit of Pachuca.


Preparations for Sea Trial

During October I made more preparations for Pachuca's sea trial. 

I've got four head sails in my inventory.  The best sail is the newest one, supplied by North Sails in Argentina in April, 212.  However, it is a 9.3 oz cruising sail much too heavy for coastal cruising in this area.  Another is the laminated sail provided by Tasker in 2008.   Its stitching had failed on the way to Cape Horn, was repaired by Pato Salas in Argentina, then this spring Steve Hartley assessed the sail, did more remedial work, and declared it fit for use.  Steve also declared the boat's original genoa that I had blown out when crossing the Australian Bight in 2008 to be salvageable and did much remedial work on it, including the expensive step of replacing its worn out UV protection along the leech and foot.  The other original head sail, while salvageable, was not repaired and put aside because it is of lighter cloth and not required.  The repairing those two sails obviated the need to order a new jib, not only saving me money, but also avoiding the pain of disposing of old friends that have served me well.

I elected to put up the original heavy jib rather than the laminated sail, which I decided to hold back for long distance cruising, be it by me or a future owner.  During our subsequent sea trial in mid-December I saw a familiar slit under a section that had been patched by Steve and realized that this was the sail that took me around Cape Horn after the massive stitching failure of the laminated sail only about two weeks out of Mexico.

I noticed that the starboard spinnaker pen line was almost worn through due to constant rubbing by a stanchion that was directly in line between the post and the deck cleat.  Kim Jamieson's solution was to produce a longer springer that reaches another deck cleat about a meter closer to the bow, thus avoiding the stanchion.

I purchased a new jib halyard.  The existing halyard over a meter too short, necessitating the need for a "messenger" line every time I dropped the jib.  The riggers had extended the jib during Pachuca's recent refit but, alas, the extension was too short.

Calculation of the length of the new jib halyard had to be accurate, and on the internet I found the equation L=(2.1xI)+Y+1, where I = (distance along the front of the mast from the highest halyard to the deck), Y = (distance from mast to halyard winch), and the constant 1 is "to be sure" fudge factor.  Using Pachuca's values of I=14.9m  and Y = 3.4m yielded a halyard length of 36m.  I confirmed that result with my own calculations and found it to be extremely accurate.

I also replaced the roller furler line purchased in Brazil which was wonderful to handle because of its thickness but filled up the drum too fast, preventing full extension  of the genoa. The new line is 3m longer at 30m total length, with diameter reduced to 8mm.

I put up the mainsail without a problem over two days working as patiently and methodically as possible.  On the third day I faced raising the genoa, which I knew would be difficult working alone.  I had just fed the tip of the luff cord into the track and was about to start pulling the halyard with one hand and feeding the sail with the other when I got an unexpected visit from my neighbor of two pens up the jetty.  He introduced himself and wanted to meet him because he knew that I placed him in the club's Cruising google group.  We chatted for a while before I asked to be excused so that I could complete my work before the afternoon sea breeze came up and he asked what I was doing.  He then asked if he could help.  Of course I said Yes and we then spent a difficult 30 minutes feeding the sail up the track, immeasurably helped by his suggestion that we try spraying silicone lubricant on the luff and track which I happened to have on board.  I thanked him profusely for his help, marveling at how he had appeared out of nowhere at exactly the right time.  (I've learned to accept these recurring experiences of serendipity at face value with no need for an explanation, but with much gratitude knowing that they are not random.)
  

Wednesday, October 30, 2019

Maxwell RC10 Installation

Shortly after unpacking the new Maxwell RC10 we discovered that the gear oil sight glass had been sheared off.  I had found the sheared off part of the sight glass in  corner of the shipping box that had been stained by the gear oil that had drained during shipment.  Sharp eyed Bruce pointed out the track of  fork lift blade that had skimmed a track in the foam packing.  He figured that the dispatchers had a quick look, noted nothing wrong, and simply put everything into a new box.  With the help of Jerry we obtained a replacement, but that cause another delay of several days.
Block with insert to decrease diameter of central hole

Fitting the winch studs through deck block

Supplied pattern was too generous with hole diameters

We were not happy with the deck mounting jarrah block that Zelko had produced because there was not enough wood between the edge of the large central hole and the surrounding four smaller holes for the winch studs.  We noted that the pattern supplied had been too generous with the central hole and that we could make it almost 10 mm shorter in diameter.  This had been compounded by Zelko having cut the hole about 2 mm larger than the specification.  As usual Bruce knew someone who could fix that, a shipwright who managed to put a perfectly fitting inner sleeve to make the hole smaller.  While we had the opportunity we asked him to also make a jarrah backing plate to it on the V-berth ceiling, and to that end we supplied one of the old stainless steel backing plates for the curve of the ceiling.

Sometime during this process I went on trip to the USA which cost us another 7 weeks of time.

Bruce and I resumed the installation in late September and in mid-October we finished the installation and got a visit from Greg Hansen who wired up the new winch and its new solenoid.  Bruce then sealed the gaps around the edge of the deck mounting block with black Sikaflex and we tested the seal with water and were happy to see no leaks.

The result has been very good.  The unit is firm on a strong foundation and hoists the chain at a speed that I've never experienced before.


Sheared off oil sight glass

Winch holes covered for weeks with no leaking

Mounted but edges not yet sealed no chain fitted
Below Deck

Note curved jarrah backing plate and area freshly painted

More on Winch Removal

Here are more photos of the removal of the Orca winch.  Jerry Davis worked very hard to remove the winch intact and we tried everything from soaking whatever we could overnight with penetrating oil to heat and finally a metal lever. Nothing worked because the shaft was fused with corrosion and Jerry was forced to cut the winch in pieces with an angle grinder.  It's a shame because the Orca had been built very solid and strong.  Jerry's post mortem revealed that the transmission was full of brass rust (?) and the shaft had been squeezed so tight that the strain on the motor had ruined it. He also stated that the small oil drip that had begun this process could not have been corrected by simply replacing seal because the metal was so corroded. 

The sad state of the winch was mainly my fault largely due to ignorance.  I took  possession of Pachuca in 2005 with absolutely no documentation whatsoever - None!  I had to learn on my own how to take apart the boat's 6 Maxwell sailing winches on my own but never even thought of looking into the Orca anchor winch.

Jerry recommended a Maxwell winch and after googling the various offerings concluded that the Maxwell RC10-10 was my choice, not just on price but also because it would fit the holes already through the deck.  (http://www.maxwellmarine.com/gen_rc.php?features)

Orca Winch Before Removal

Shaft Exposed

Attempting to Lever it Apart

Last Resort: Jerry with the Angle Grinder
Deck After Removal of the Orca

Wednesday, June 26, 2019

Anchor Winch and Sails

There was a spurt of activity in the winch replacement project.

On Monday morning Jerry told me by telephone that he had discussed the issue with Maxwell and could recommend either of two of the company's offerings.  I responded that I had been doing research of my own and had concluded that the Maxwell RC10-10 was the most appropriate for my boat.  Jerry replied that his preference was also the RC10-10, which was an excellent start to the project.  We agreed to meet at the boat at 11 AM to discuss the matter.
Removing old mounting block

Block removed, teak at  left cut out

Chain hole drilled

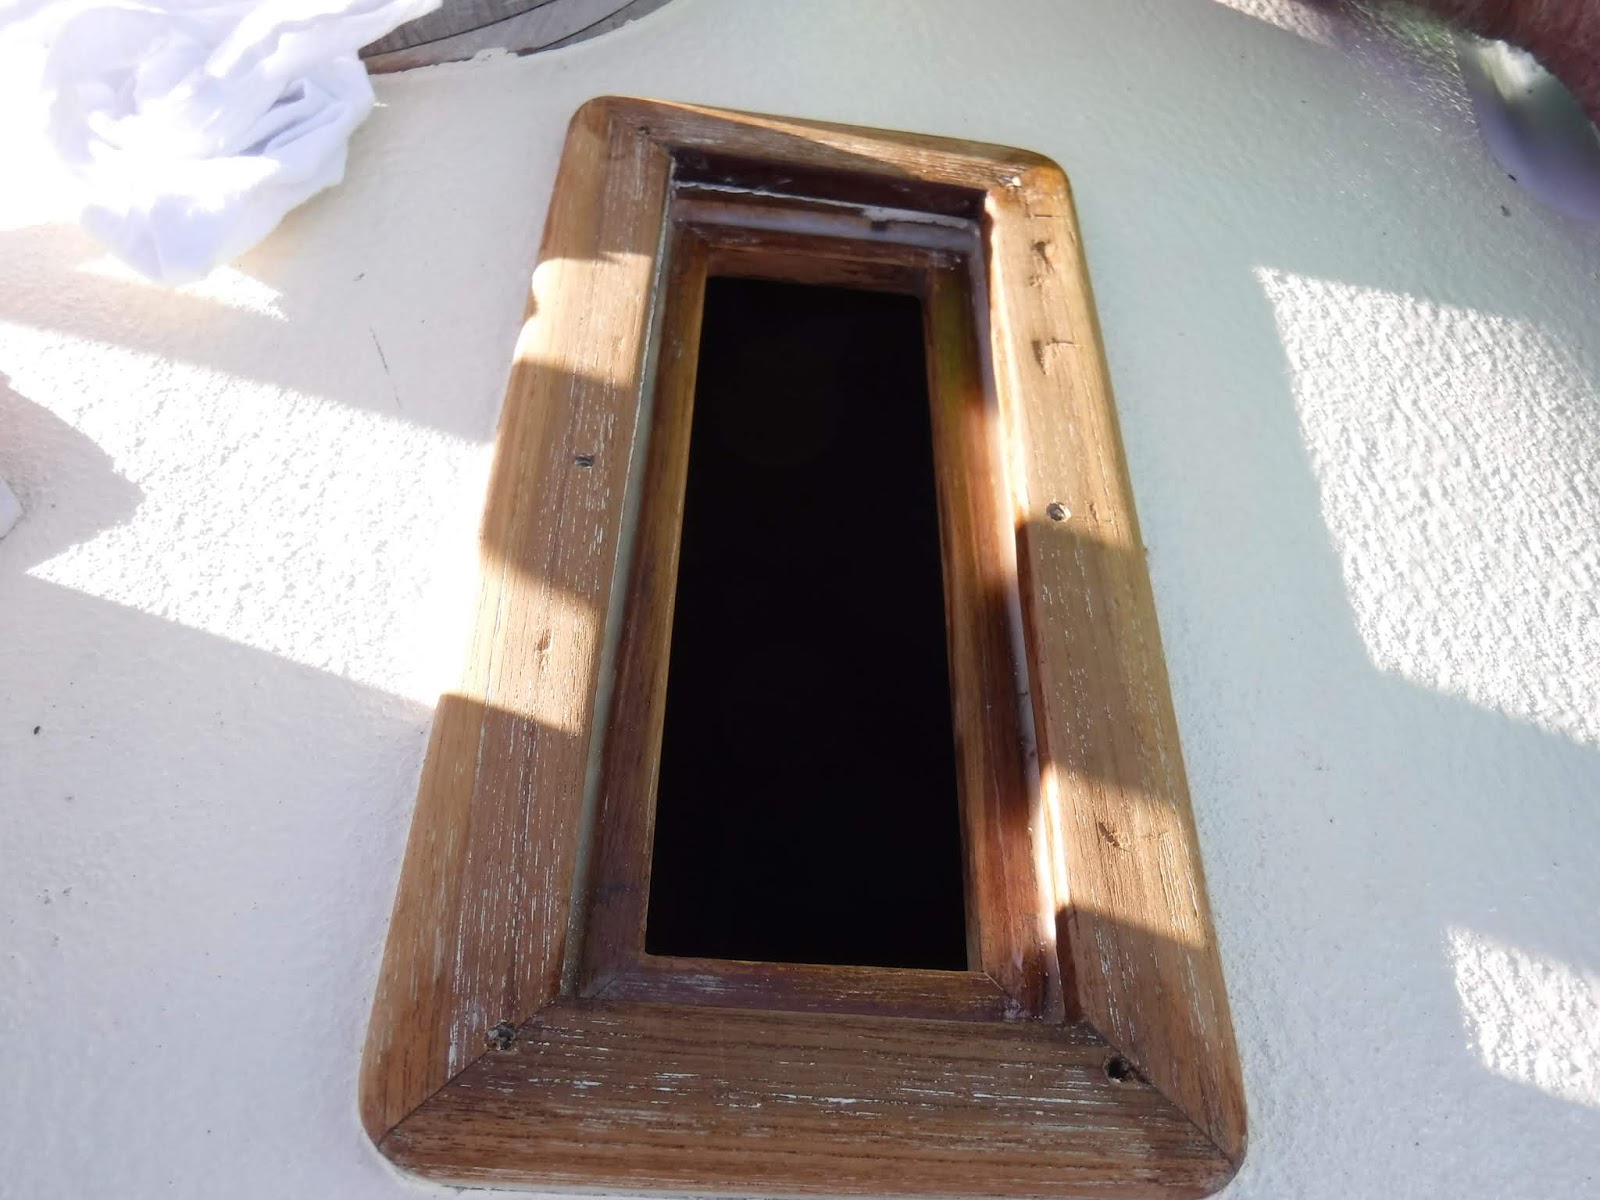
Winch mounting block in position

Jerry came well armed with a Maxwell catalogue that contained much more information than what is available on the internet.  We discussed the variations available for the RC10 and agreed on the actual part number to be ordered.  It was no accident that Jerry had come so well armed with information because in the past he had been Maxwell's maintenance person for the Perth area.  I received his invoice for the new winch on Tuesday and made payment on Wednesday.  The winch will be shipped from Queensland and delivered to a business in the area.

On Monday I spoke also to Bruce to discuss the fitting of the new winch.  Using a paper template for the RC10-10 Jerry and I had seen that the existing wood mounting base would require an extra 30 mm on the port side we all agreed that the simplest thing was to replace the entire base.

Within an hour Zelko the wood specialist was on board and we agreed on the shape and dimensions of the new mounting block. I went along with his suggestion that jarrah would be used because it is much stronger than teak. Zelko finished his visit by removing the old mounting block with remarkable ease.  He also skillfully removed a section of the teak decking to accommodate the larger mounting block.  The old block was made of meranti, a good rain forest wood that is nevertheless not as strong and durable as jarrah.  The old block was of two pieces glued down the middle and the wood was in bad shape.

Early the next day Zelko arrived with the new block made of a well seasoned piece of jarrah (more than 20 years old) and a hefty 40-45 mm thick.  Bruce soon joined us and we agreed on how to proceed.  Zelco fit the piece, which required him to first scallop out the bottom side of the block to accommodate the camber of the deck.  He then drilled the hole for the passage of the chain rode to the chain locker below.  The larger hole for the body of the winch would wait until the actual winch was on hand.  Once the required holes (including 4 bolt holes) had been drilled the block would be well coated with Everdure then glued to the deck.  At that point Jerry would arrive to oversee the actual installation.

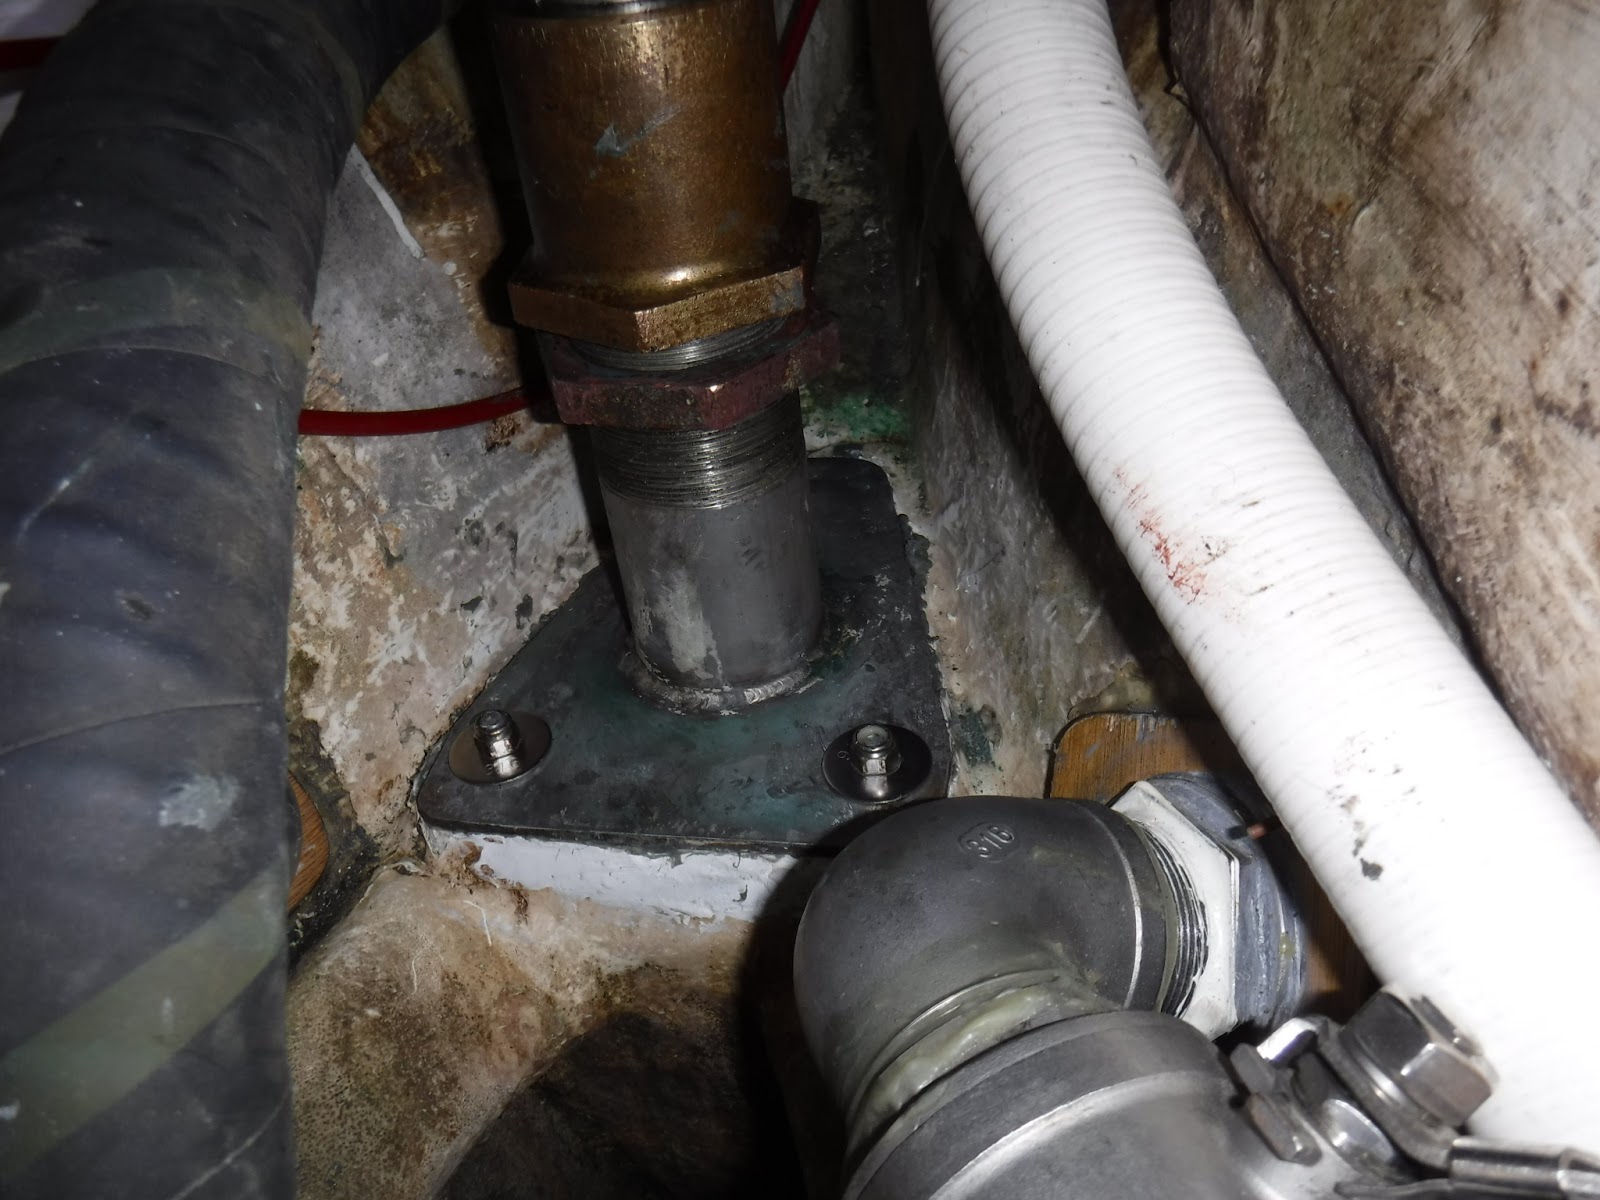
Below the deck were two thick metal backing plates that had been expertly shaped to match the camber of the deck.  Bruce will arrange for a new backing plate to be made because the pattern of the four holes for bolting down the new winch is different from that of the old winch.

Although we have the capability of wiring in the new winch (we took plenty of photos) we will attempt to have our effort checked out by Greg the marine electrician if he is back from a trip to New Zealand.

On the sails front I completed the job of removing the accumulation of deck paint under the car tracks which prevented free movement of the cars.  (They would move only with the use of a hammer.)  I tried sanding by hand but the awkward job of sanding the rock hard anti skid deck paint by hand would have taken weeks and probably done damage to my thumbs.  I modified my angle grinder to take a circular sanding disk and completed the job in about two hours.  Sure, the appearance of the deck paint has been marred by the removal of paint a times exposing the fiberglass but it had to be done because I needed to remove not only the recent deck paint but also the paint from earlier times.  I plan to touch up the areas under the tracks with a thin layer of left over deck paint  without the anti skid material.

The mainsail is on board and ready to go up now that I managed to replace the "gate" clip that prevents the sail slides from dropping to the exit openings by cleverly (if I say so myself) modifying an off-the-shelf clip that was not quite long enough.

The head sail story is somewhat interesting.  I was thinking ahead about clearing the enormous amount of junk stored in my garage and shed. There were two head sails that had been damaged on the circumnavigation and I had to either use them again or dispose of them.

My best head sail had been made by Steve Hartley of Taskers in 2008.  Due to over canvasing the boat through several gales while crossing the Bight I blew out both of my head sails.  While I was having those sails repaired in Adelaide I telephone Steve and that night he had the cutter at work for the manufacture of a very strong "laminated" sail.  The front of the sail was so thin that I could see stars through it, and the back of the sail was of standard material, probably Dacron.  The idea was to save weight.  In light airs the entire sail would be rolled out but as the wind got stronger the sail would be rolled in, leaving the stronger material to take the load.

The stitching of that sail gave way along two seams while approaching Cape Horn and I was forced to bend one of the sails that had been repaired in Adelaide and managed to reach Argentina while staring at the small slit in the sail and the flimsy looking patches along the tears.  During this time I spent many difficult hours using a palm to force a needle through the steel hard material to prepare the damaged sail for emergency use.  In Argentina Pato Salas did a more professional sewing job, but he did say "You still need a new head sail."  I wanted no more sail problems so I visited North Sails in Buenos Aires and asked for a head sail that could carry me through 45 knot winds.  The result was a heavy (about 9.5 oz) cruising sail that even today looks like new.

Back to the present day, I rolled out the laminated sail on the ground and to me it appeared to be in remarkably good condition.  I then rolled out the heavier of the two head sails that had been repaired in Adelaide and it looked even better.  On that basis I took the sails to Steve Hartley for an assessment.  He pronounced the laminated sail to be in amazingly good shape and he could get it ready for use for only about $500.  The Dacron sail also looked very good but replacement of the UV material along the foot and leech would make its restoration a bit pricier at about $1500.  Because I must either repair the sails or purchase a new one for about $4500 and because I hate discarding things that still have usefulness I gave Steve the OK to repair both sails.

The sails are now ready for pick up and I will probably put up the laminated sail and store the Dacron sail at home along with the heavy cruising sail at home to minimize the weight and clutter on the boat while I am doing local cruising.
Channels for wiring

During the week I also installed some channeling provided by Greg to tidy up the wiring between the main panel and stern.


Sunday, June 23, 2019

It's not over yet

I thought that the refit ordeal was over when I brought Pachuca back to her pen, but now I have the task of replacing the anchor winch.  I have put it thus to friends: The war is not over, only the battlefield has changed.  (These are times to try men's souls.” - Thomas Paine)

On the brighter side, here are photos of Pachuca in her pen.


Replacing the anchor winch

Late last year I was referred to Jerry Davis regarding tiny amounts of oil dripping from the anchor winch gear box whenever I activated it.  For various reasons Jerry asked me to contact him after the boat was back in her pen and last week he attended to the winch.

The motor had been replaced in New Zealand in 2008 but the gear box was the original from 1983 and it showed.  Jerry worked hard for several hours over two days attempting to remove the winch without damaging it but everything that he tried failed, including drilling holes around the perimeter of the corrosion-fused top bearing, soaking the top of shaft over night with penetrating oil, and my using a heat gun on the fused top plate to the point where the wood underneath began to smolder.  Jerry called it the worst winch job that he had ever encountered and coming from a trained fitter and turner with many years of experience that is a very strong statement.  He commented that the shaft was so tightly bound that he was amazed that the winch had worked at all.

I agreed with Jerry that given that the winch was 36 years old and had had a very hard life at the bow of a low freeboard boat it was probably not worth saving, particularly since as far as I could tell Orca winches were no longer manufactured and parts would probably be impossible to get.  He then spent another difficult hour with an angle grinder cutting the top  plate (beautifully made of thick bronze) and removing the unit.  He subsequently did an autopsy on the gear box and that evening sent me the following cryptic text: "Gobs full of brass rust and dirty oil ...."

Jerry recommended a Maxwell winch as being the best value and I am awaiting his recommendation and quotation.  In the meantime I did some research of my own and I think that I have identified the suitable replacement: a Maxwell RC10-10.   It can take a rope/chain rode, meaning that I'll have the capability of using less heavy chain.   Also, the through-deck hole has the same 100mm diameter as did the Orca.

Fairly new winch motor, corroded original gear box

Shaft fused at both ends with corrosion

Jerry cutting through the top plate

Winch Removed

Hole covered in preparation of expected rain


Re fitting a leaky skylight

The first serious rain in months revealed that the skylight was leaking.  At first Bruce thought that the solution would be a simple job of sealing the mitered corners of the teak frame with Epiglue, but that was not to be.  We were forced to take the entire system apart.

The job of installing the skylight while I was in the U.S.A. had been entrusted to a man of many years experience who should have known better and will remain nameless.  He had done a slap dash job with Sikaflex sealant.  The Sikaflex was the incorrect material and was not sticking to the metal frame, providing one vector for the leak.  A second vector was the mitered corners mentioned above.  The third vector was around the six screws holding down the metal frame that had been fixed with no sealant.  Worse,we found that the edge of the thru deck opening had not been properly filled, allowing water to seep into the balsa core of the deck between the layers of fiberglass which would have eventually led to serious damage.

After over an hour of patient work we managed to work through the sticky Sikaflex and remove the entire skylight. Then we cleaned the the entire system with acetone and some sanding.

Then Bruce got to work at what he excels at.  He sealed the edges of the thru-deck opening with Epiglue, applied with a syringe and finished off with his finger, rendering the gap between the two layers of fiberglass  now impervious to water.  The Epiglue dried overnight and the next day Bruce appeared with a carefully selected "neutral" silicone sealant that will stick to metal as well as the usual materials.  He used the sealant liberally then inserted the screws with plenty of sealant then screwed the metal frame down as we watched the sealant ooze out under the pressure.  Some of the sealant oozed into the perimeter of the prism but that could not be helped and in any case was barely noticeable because the sealant unlike the Sikaflex is translucent.  The result was "bullet proof" as they say, and I will confirm the outcome when I return to the boat today after two days of at times heavy rain.

I estimate that the initial sloppy job of installing the skylight would have taken one hour tops,  and it took Bruce and myself at least four hours spread over two days to redo the work correctly.

Skylight clean and ready for re fitting

Epiglue around perimeter of the opening to protect the deck core

Applying the silicone sealant


Plate pressed down and ready for screws


Monday, June 10, 2019

Launching Jetty Party

On the afternoon of Pachuca's relaunch, Friday 24 May, we opened the boat to friends and fellow sailors who might be interested in seeing the fruits of the refit that had lasted more than a year.

Brenda and Dolphie did a wonderful job of providing warm and yummy finger food complete with all of the necessary plates, glasses, cutlery, etc all splendidly laid out on a table that we dragged over from another part of the works jetty.   I had the simpler and unimaginative task of providing the drinks and ice.

The 4pm start time approached with us expecting anywhere from 0 to 30 guests and we wound up with a group of about 25 by one estimate, composed of fellow sailors from the club (and one from Hillarys), two colleagues from my working days at the university, and other personal friends.

Toward the end of the evening I paid tribute to Bruce Diggins and the wonderful work that he had done on Pachuca.
Wonderful group of well wishers

Bruce with Brenda at his right and wife Dolphie at his left.  Victor Mews far left, Zac Armanasco far right

Small Jobs

After the boat was back in her pen I installed  two small lights that had been provided by Greg Hansen on the new switch panel.  The one over the "steerage light" is particularly important because it is so easy to forget to turn that light off after working under the cockpit.
Warning lights for cockpit and steerage switches

Vents above and below inverter compatment door


Greg had also mentioned the compartment behind the navigation housing the 60-amp inverter needed ventilation and next day I installed two vents, one high and one low.

Mast Stepped

On 23 May the boat was removed from the shed and was back in the water for the first time in over a year.  The next day the riggers Steve and Christian stepped the mast.


New pin to secure the mast to the compression post


Sea trial and back to her pen

On Saturday 1 June Bruce, Dolphie and I motored from the works jetty out to the shipping channel then back to Pachuca's home at pen D81.  After the boat was safely tied up I had a look at the main part of the bilge under the cabin table and found it to be bone dry, the first time that I had ever seen this after a run out to sea.


Bruce at the helm


Dolphie at the helm


A Picture is worth a thousand words


Deck platform mounted

Last week Bruce and I bolted the what I call the deck platform into position.  I had the platform made in Mexico to house the life raft, provide a seat for sipping wine when at anchor, and provide an invaluable elevation for managing the mainsail and its cover.


Add caption
Against all my instincts I had allowed the workmen to screw instead of bolt the feet to the deck after their assurances that there would be no problems.  The first problem was that I was forced to file off the tips of the screws that were protruding through the cabin ceiling. Then over time ugly streaks of rust bled into the cabin ceiling.  This time Bruce and I did it right with well sikaflexed thru bolts.

Dolphie did a wonderful job of polishing the stainless steel frame then  sanding and coating the teak with 2-pack marine varnish.

Leak Found

During Pachuca's launch celebration on Friday 24 May Bruce and I kept quiet about a leak that we had detected soon after the boat had been lowered into the water in order to not - well - put a damper on things.

The boat was taking in about 1 bucketful of water per day through one of three bolts through a plate holding down a collar through which the rudder post passed.  The collar is a large packing gland which is bolted directly to the fiberglass of the hull. We believe that the area had been disturbed during the difficult procedure of removing the rudder.

Leaking plate raised to reveal urgent need to clean and re bed

Re bedded and ready for plate

Plate with attached sealing gland in position


Bruce wasted no time in resolving the problem. Glen Swarbrick visited on the following Monday morning for invaluable advice, we had the boat lifted out an hour later, Bruce managed free the plate and slide it and the collar to which it is welded up the rudder post, and after another visit by Glen the following day and some very hard work by Bruce during the next 3 days the boat was lowered back into the water the following Friday 31 May and no leaks were found.  


Blog Archive

Contributors

Statistics Click Me