

It is only 2 PM and I am having an early beer celebrating one of those extra-good working days when everything comes out OK.
I wisely decided against rushing the fiberglassing of the chain locker bulkhead. Instead I got some graph paper and working off the bulkhead measurements that I had taken when I rebuilt that section seemingly so long ago in Fremantle, I got a good scale drawing of the shape of the fiberglass cloth that I must cut out.
I woke up this morning pleased to see that it was a bright and sunny (i.e. no rain!) day and got to work. Working off my drawing and measurements I cut out the cloth much as I suppose a seamstress would. There was a gentle curve at the top, a cutout of 100mm x 50mm at the top center for the hawser pipe, and cutouts at the lower section to accommodate the narrowing of the bulkhead. I fixed the cloth on the bulkhead with four stainless steel staples across the top using Wally's heavy duty stapler. With the cloth hanging comfortably on the side of the bulkhead I cut out darts wherever the fabric would make compound turns. I then flipped the cloth out of the anchor well and then sanded the interior-side of the bulkhead to ensure a smooth surface between the bulkhead and the ply insert. I then mixed some epoxy resin and coated the ply inserts on each side of the bulkhead and the entire bulkhead on the anchor well side in preparation for the fiberglassing. Then I thickened the epoxy to a paste using 407 thickener and proceeded to push the paste through the 8 holes through the bulkhead that had been used to fix the inspection hatch. I then used the remainder of the paste to smoothen out the perimeter of the ply inserts on both sides of the bulkhead. Next I mixed a fresh batch of epoxy resin, gave the anchor well side of the bulkhead another coat, then dropped the cloth in to hang off the staples. After that it was a matter of patiently working the material from the center out to eliminate any wrinkles or air pockets in the cloth. In conjunction with this I used a brush to stipple epoxy on top of the cloth and the smoothen the resin with broad strokes. Finally I used a flat piece of plastic to squeegee the excess resin off the fiberglass and in the process ensure the elimination of air pockets. Because the fabric was 800mm wide and the top of the anchor well is 960mm wide I cut out two lengths of 150mm wide fiberglass tape to cover those corners.
While I was doing the fiberglass work Lenny showed up to do the work on my hawser pipe and chain deflector. I had known that he was coming some time and felt selfish at starting my fiberglassing effort without coordinating with Lenny. Fortunately he said that he had some setup work to do and also to cut out the section of pipe for the hawser extension. Thirty minutes later I was finished with my work and was able to assist Lenny with his.
The photos above tell the story of today's progress. The bottom photo shows the fiberglass cloth hanging off the staples ready for the epoxy resin. The next one up shows the bulkhead after laying out with epoxy and also the extended hawser pipe after Lenny did his work. You can see that the chain will now drop onto the middle of the chain locker floor and hopefully not pile up in a heap in the future.
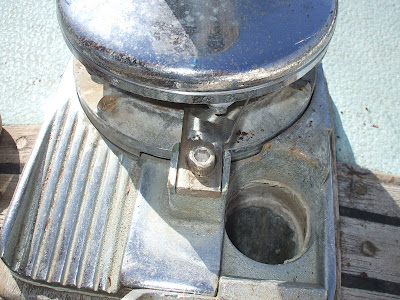
The second photo from the top is a closeup of the chain windlass and shows a modification that I am particularly pleased about. In the center of that photo you will see a piece of metal held down by an Allen key screw. That piece of metal used to be rectangular. Lenny added that section to the right which will peel off the chain well before it reaches that corner where the chain used to jam up.
I was extremely please with Lenny's work and in particular the promptness with which he completed the job (just over 24 hours). He said that he spent only one hour on the job because the setup was on his time. I looked at him sceptically and replied "if you say so" and gave him a cash payment with an extra 20%.
I couldn't resist the inclusion of a photograph of the marvelous resin and hardener pumps.

No comments:
Post a Comment